<body><script type="text/javascript"> function setAttributeOnload(object, attribute, val) { if(window.addEventListener) { window.addEventListener('load', function(){ object[attribute] = val; }, false); } else { window.attachEvent('onload', function(){ object[attribute] = val; }); } } </script> <div id="navbar-iframe-container"></div> <script type="text/javascript" src="https://apis.google.com/js/platform.js"></script> <script type="text/javascript"> gapi.load("gapi.iframes:gapi.iframes.style.bubble", function() { if (gapi.iframes && gapi.iframes.getContext) { gapi.iframes.getContext().openChild({ url: 'https://www.blogger.com/navbar.g?targetBlogID\x3d10582443\x26blogName\x3dPink+Lemon+Twist\x26publishMode\x3dPUBLISH_MODE_BLOGSPOT\x26navbarType\x3dBLUE\x26layoutType\x3dCLASSIC\x26searchRoot\x3dhttps://pinklemontwist.blogspot.com/search\x26blogLocale\x3den\x26v\x3d2\x26homepageUrl\x3dhttp://pinklemontwist.blogspot.com/\x26vt\x3d4292445769315597913', where: document.getElementById("navbar-iframe-container"), id: "navbar-iframe" }); } }); </script>

Monday, November 30, 2015

The Ninja Skirt

image 
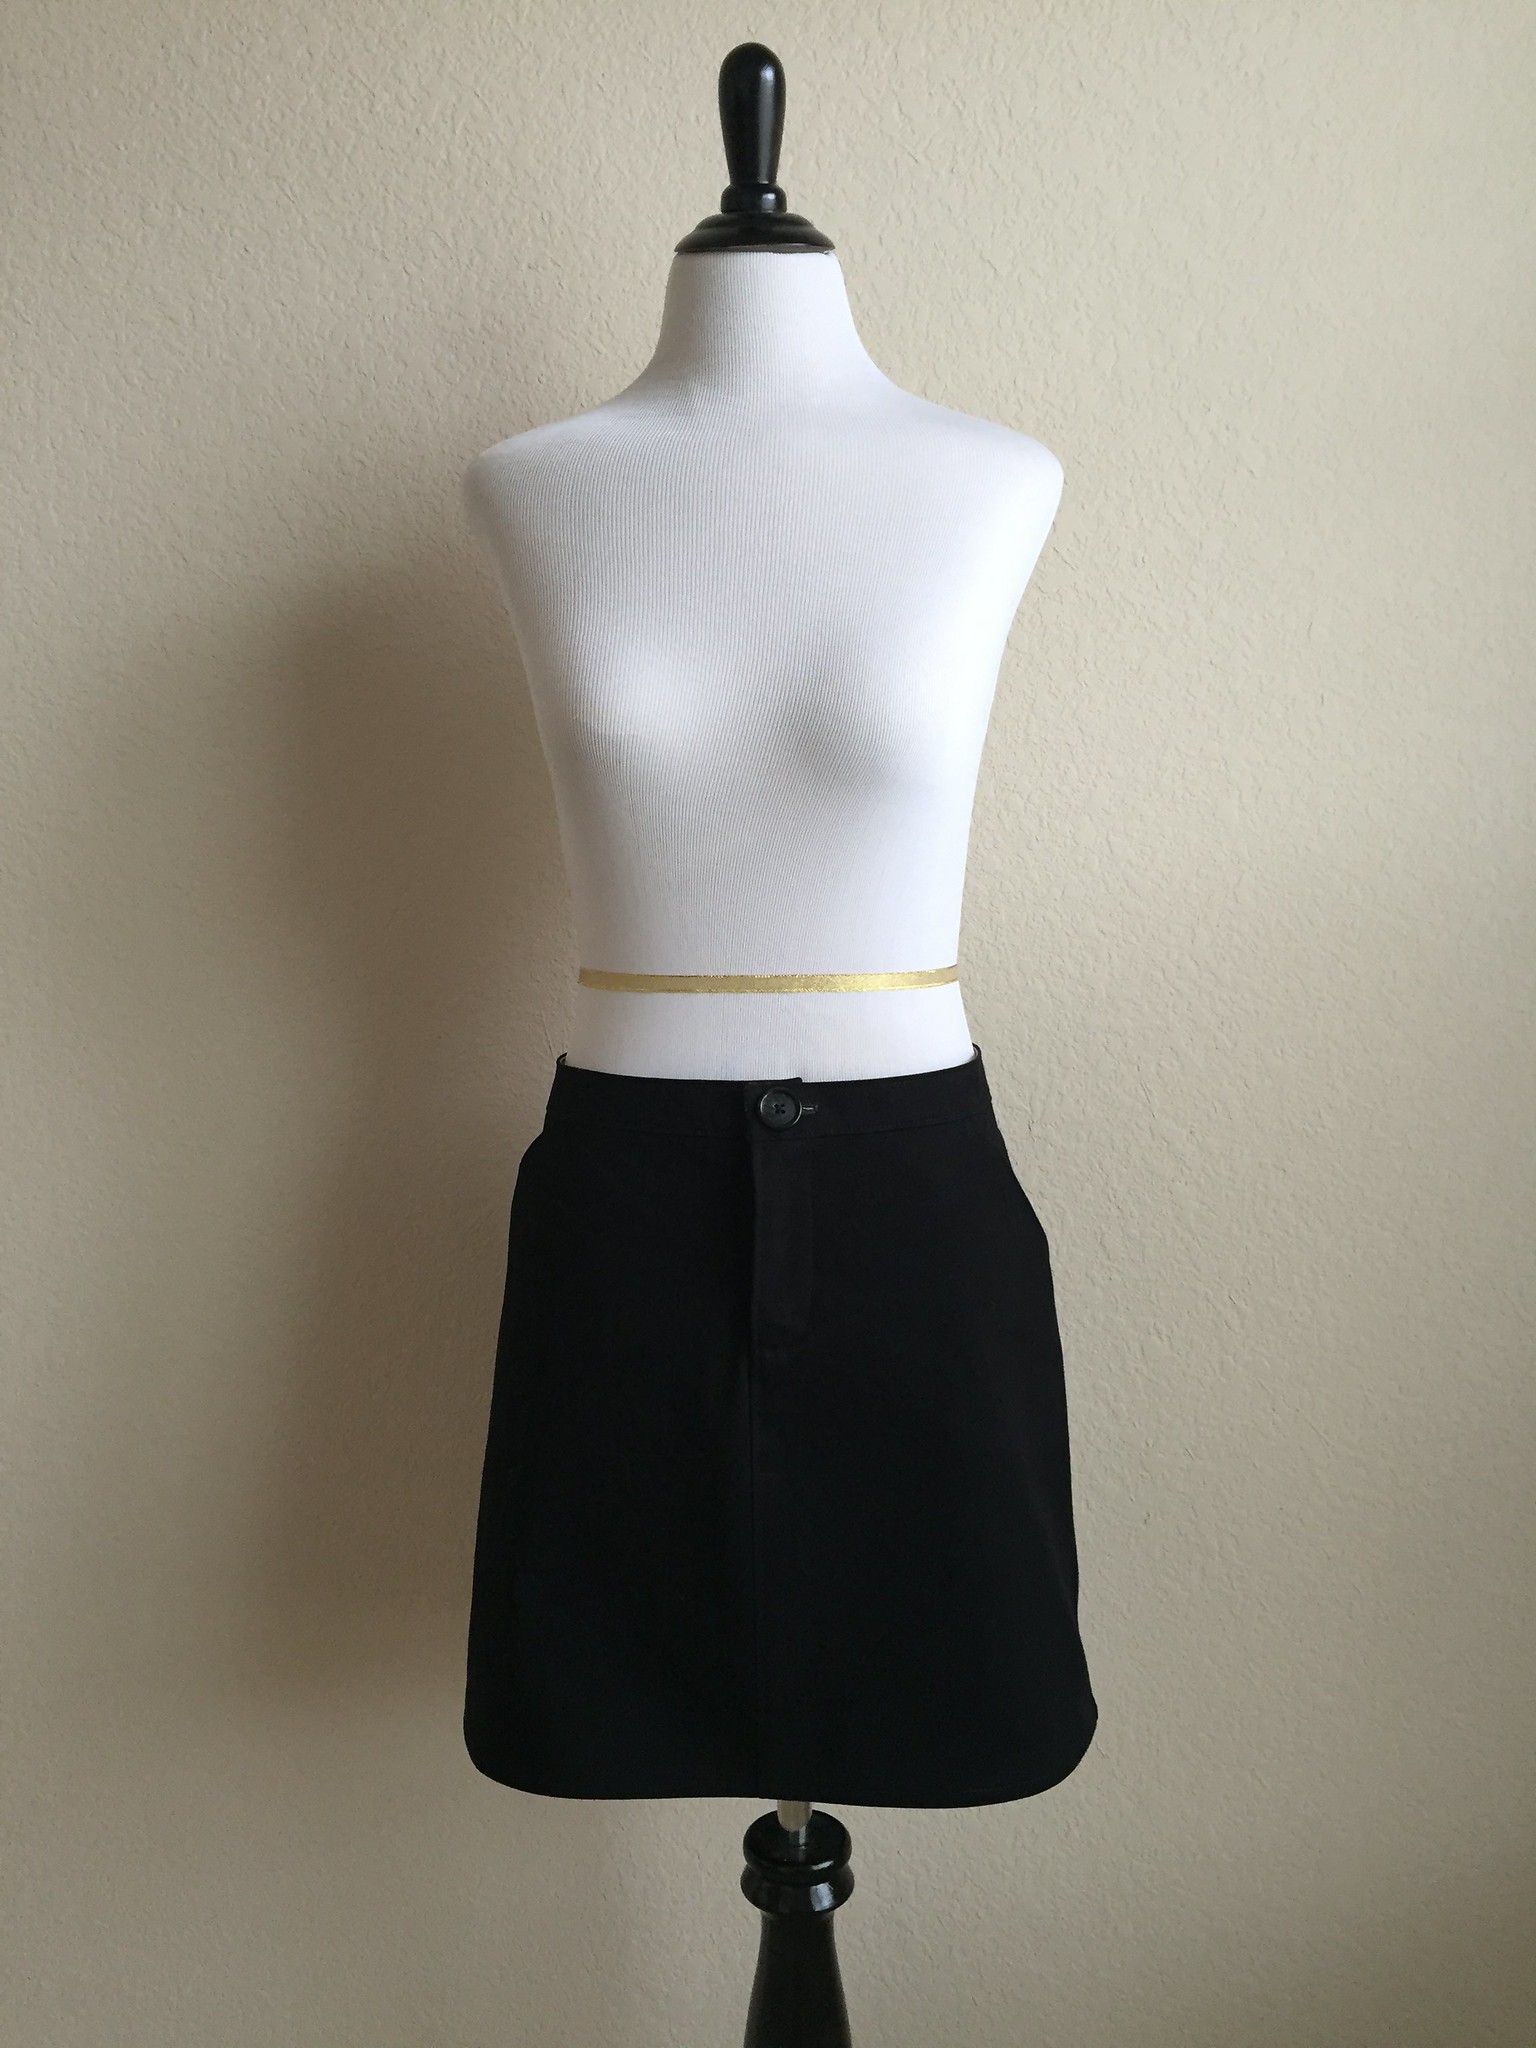
I made a skirt over the long holiday weekend and I’m thrilled with it!  This is the Moss Skirt from Grainline Studios and since it was my first time making it, I just picked up some heavy black twill from Hobby Lobby to check it out.  I think after using my 40% off coupon, the fabric and zipper were easily under $10.  I had the interfacing and the button came from my button stash.  This meant that even if the entire thing were an epic fail, I wasn’t really out very much money.  (Disclaimer, Fifi has no butt and hips.  I had to pin the skirt in the back to get it to stay on her.  Her other measurements are very close to or identical to mine, but in this case, Baby DON’T Got Back (with apologies to Sir Mix-A-Lot).)
image
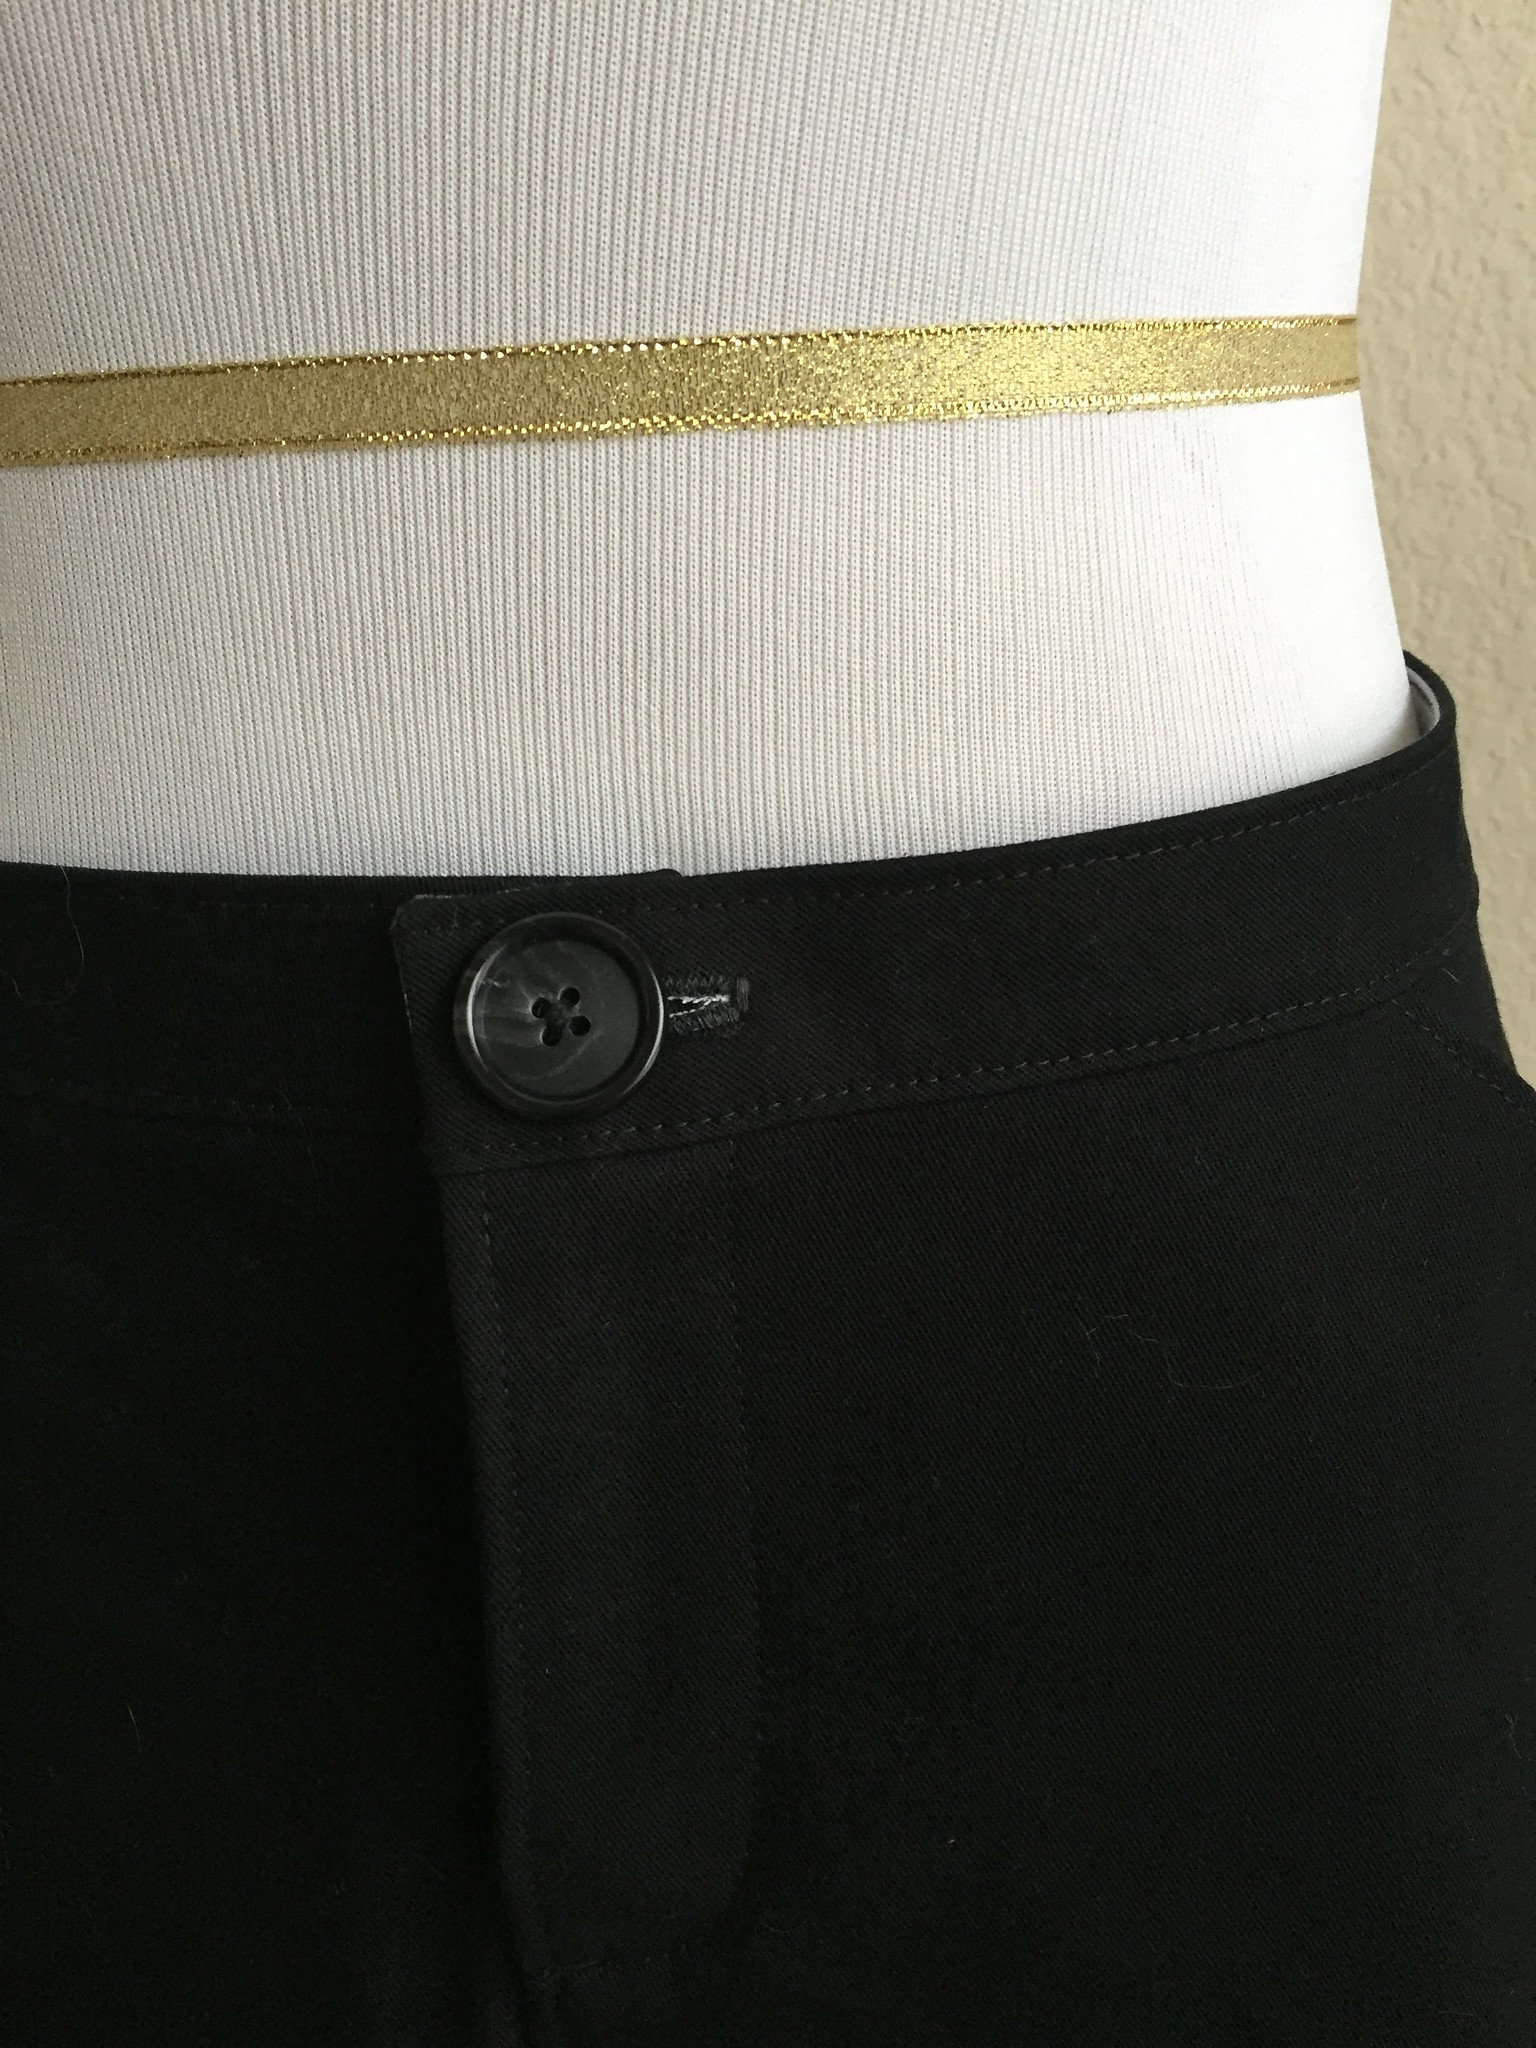
Fortunately, it worked out perfectly and I love it and now I have a super cute, super cheap black skirt!  I made the size 8 after comparing my own measurements to the pattern sizing and comparing a similar denim skirt to the measurements of the actual pattern pieces.  The big thing I was worried about was that the denim skirt was a stretch denim and my black twill was not.  I think if I were to make this skirt in a stretch fabric, I would drop down to the size 6.  The only change I made to the pattern was to add three inches to the length of the skirt.  I wasn’t sure if I wanted an additional three inches, but I knew I could always chop it off later.  Apparently, when the pattern was first released it was shorter than it is now and when you Google “Moss Skirt Pattern Reviews” they don’t really say if they used the shorter, original pattern or the slightly longer, revised pattern.  Mine is the slightly longer, revised version.  (Am I the only one who Googles for pattern reviews before jumping in and sewing?)  One thing that did throw me for a loop at first was the finished garment measurements.  I could not figure out how the skirt could have the finished length listed in the pattern, but finally I realized that the finished length of the skirt was not from the skirt waistband to the hem, but from the wearer’s waist to the hem.  The skirt isn’t meant to sit right at the waist, it sits a little bit below the waist.
image
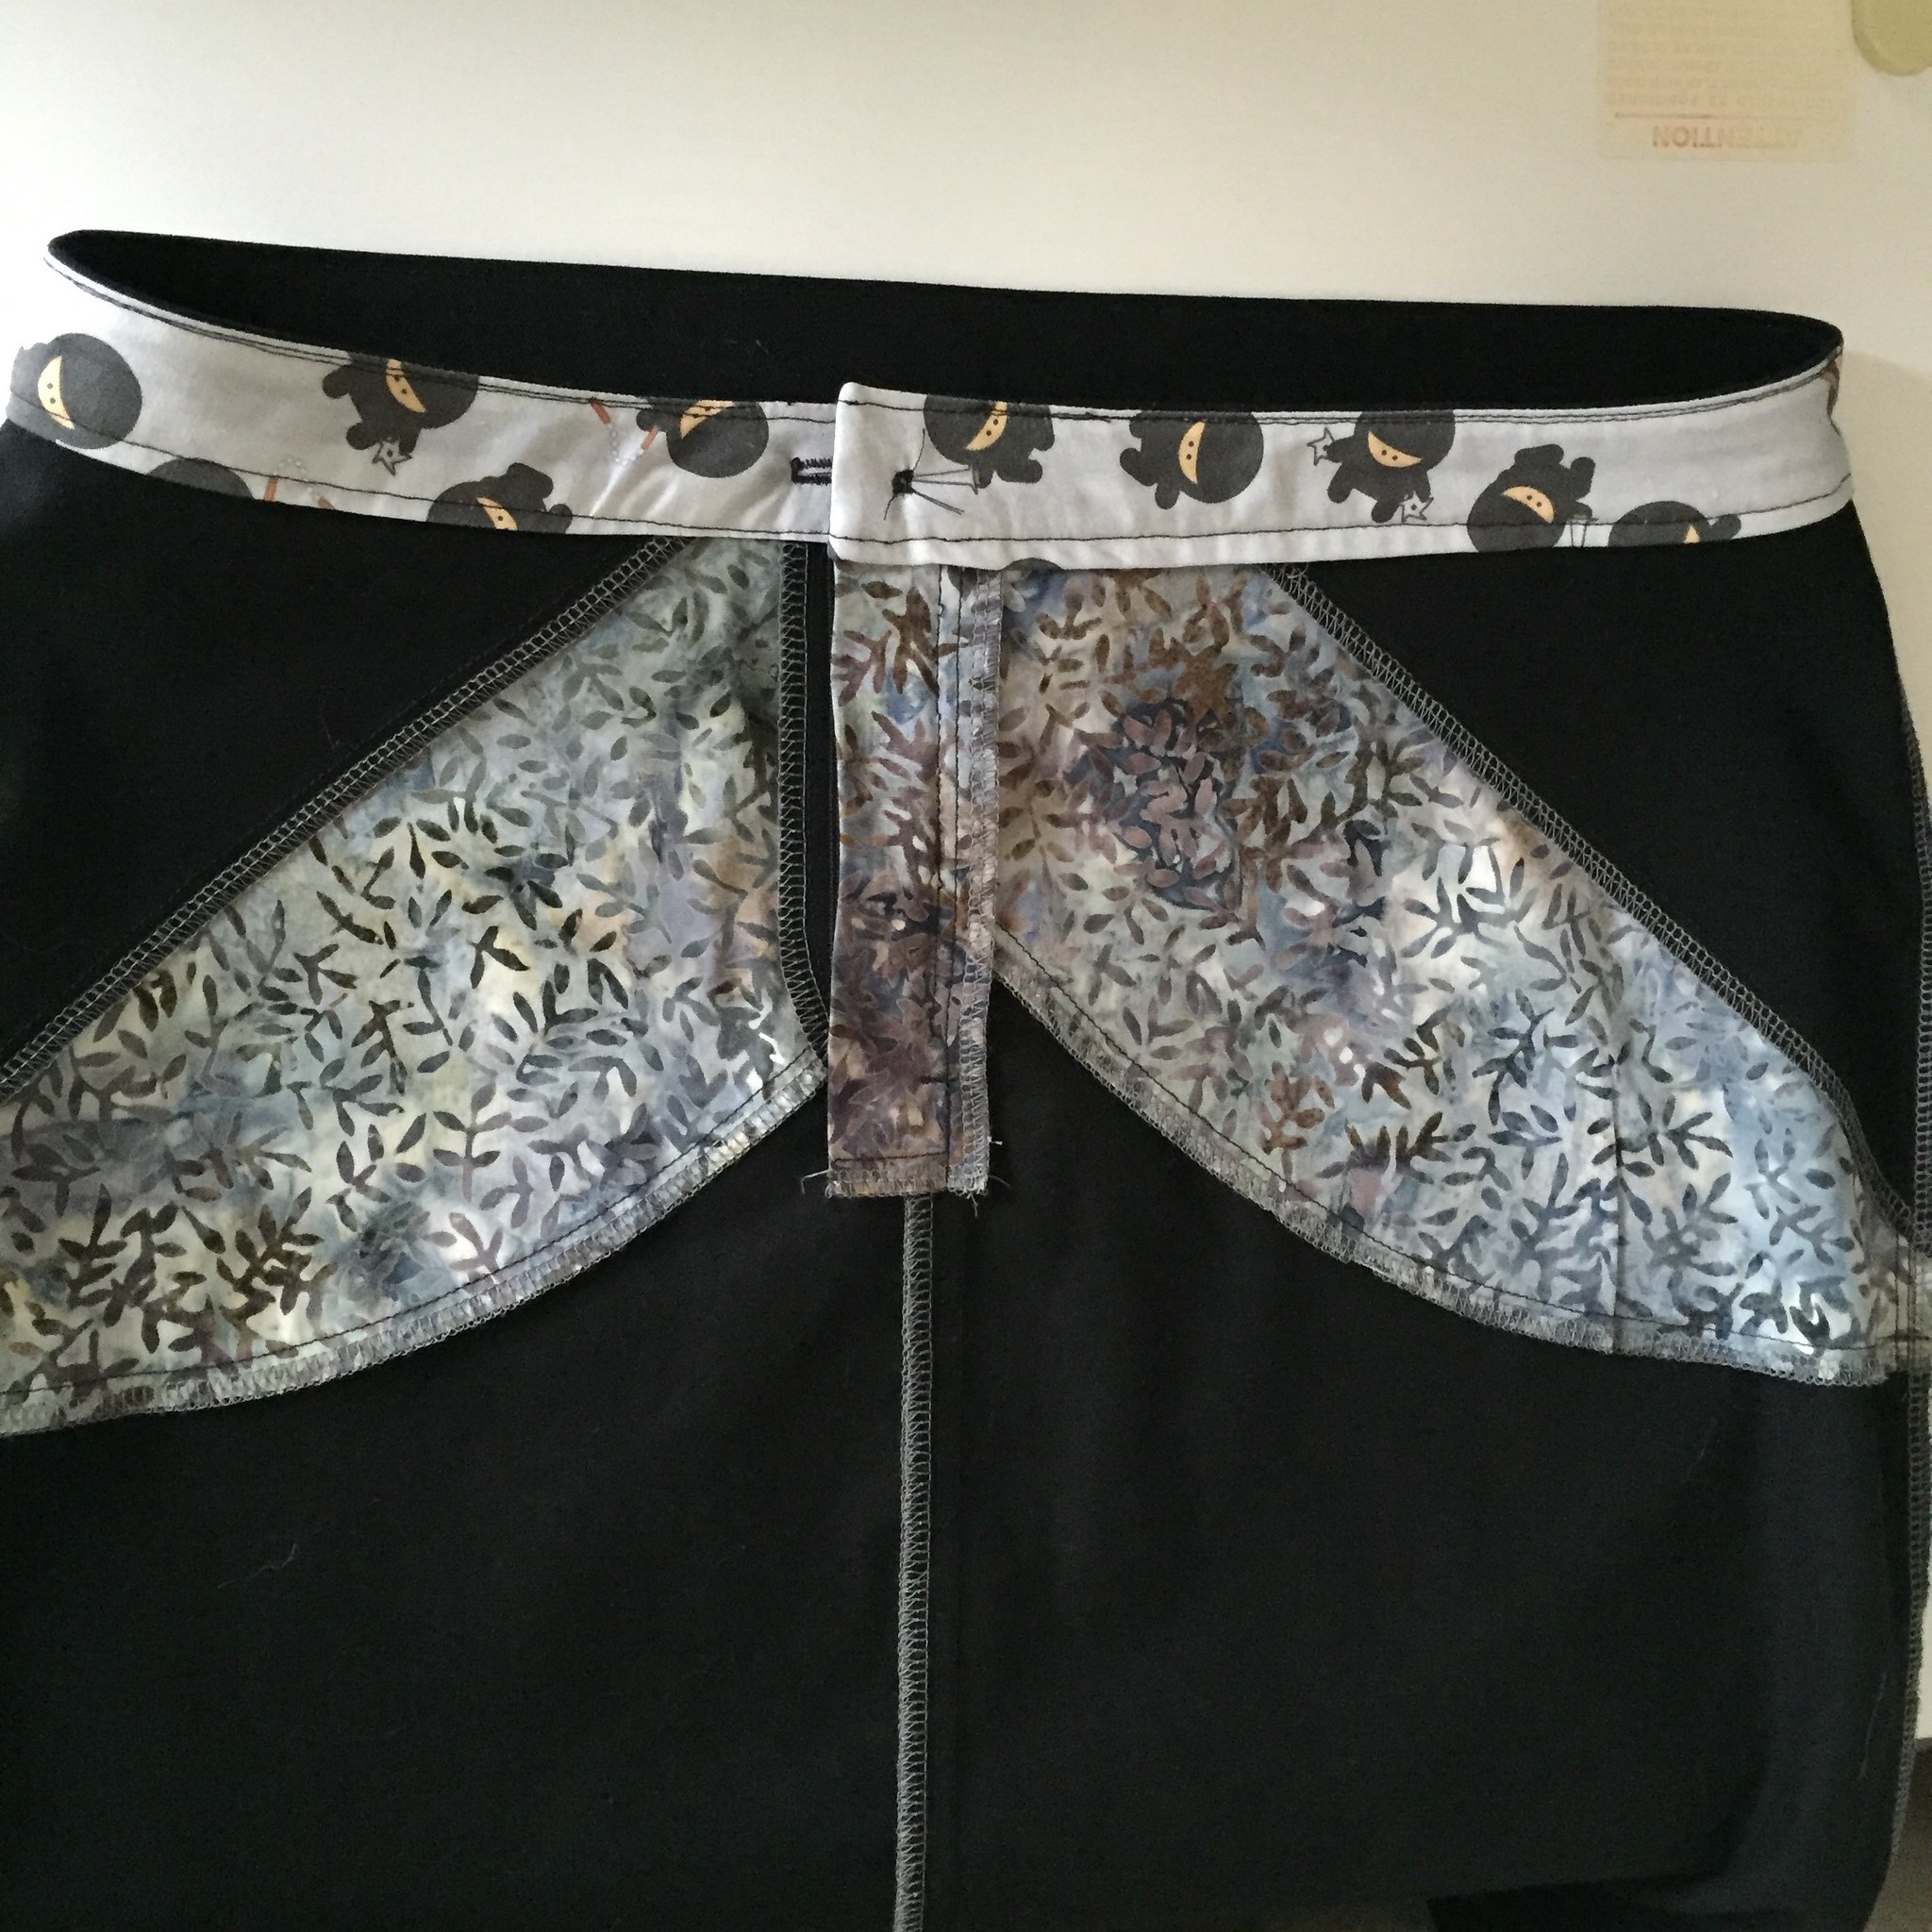
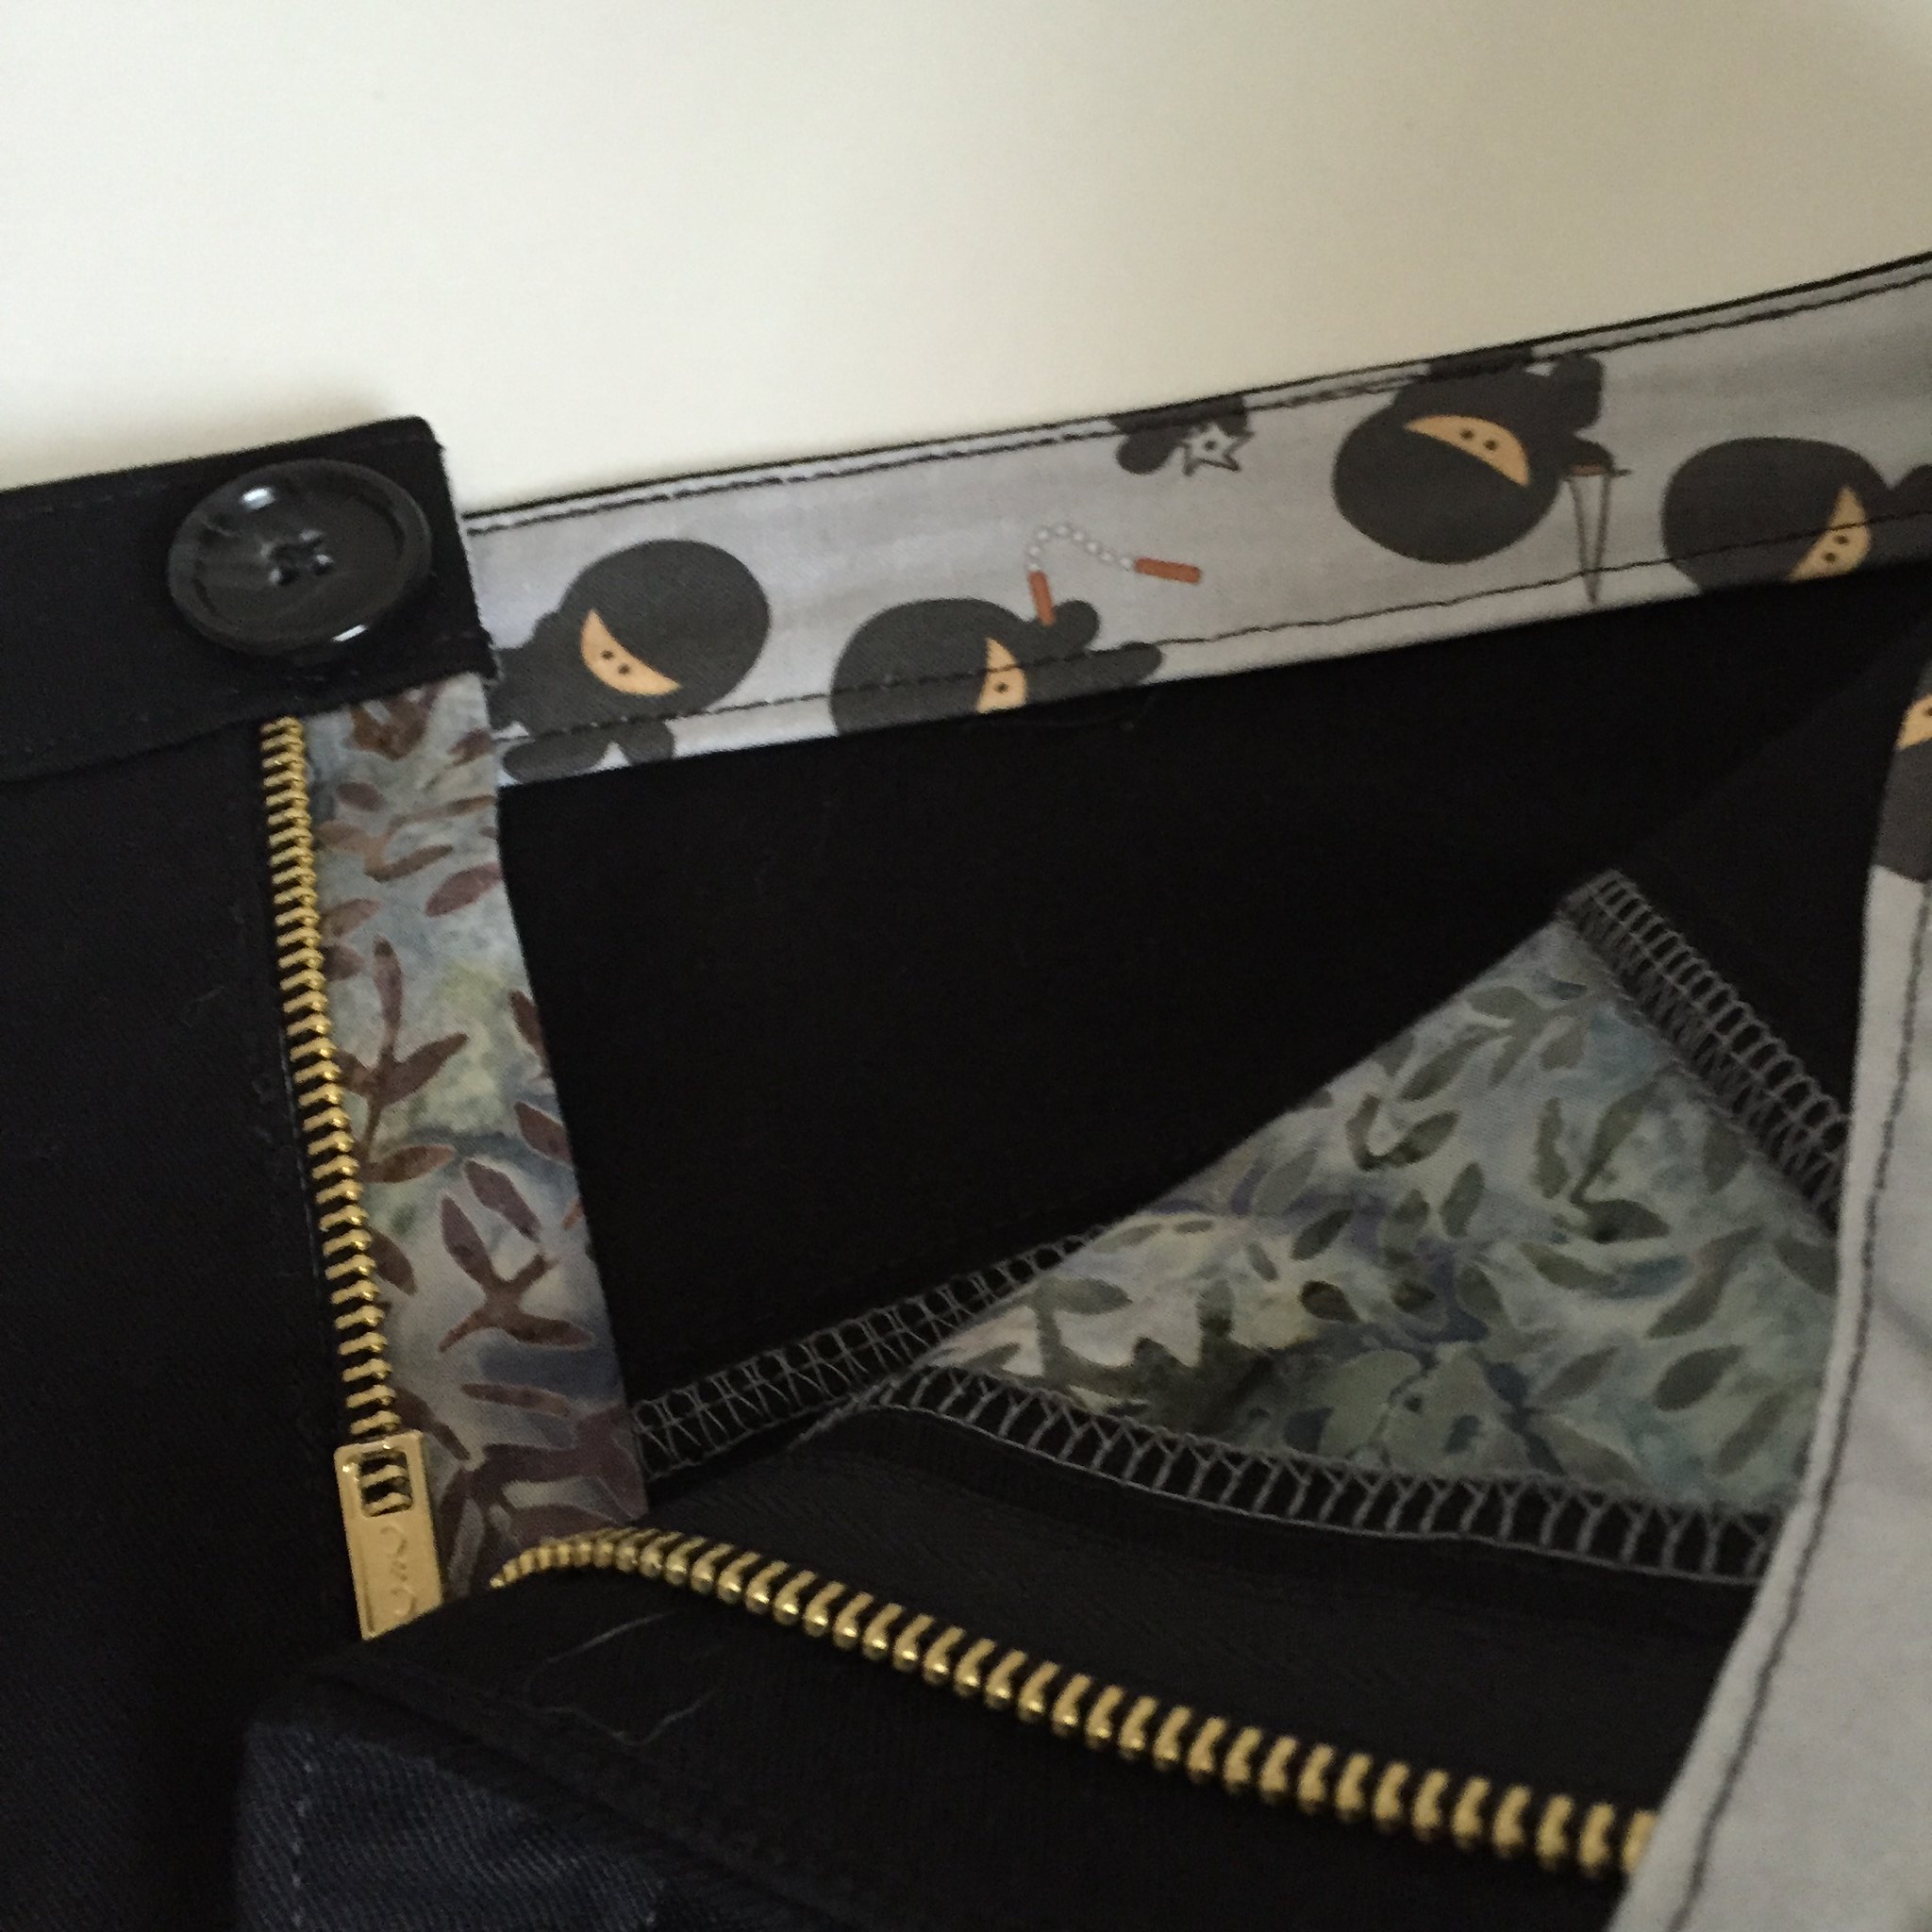
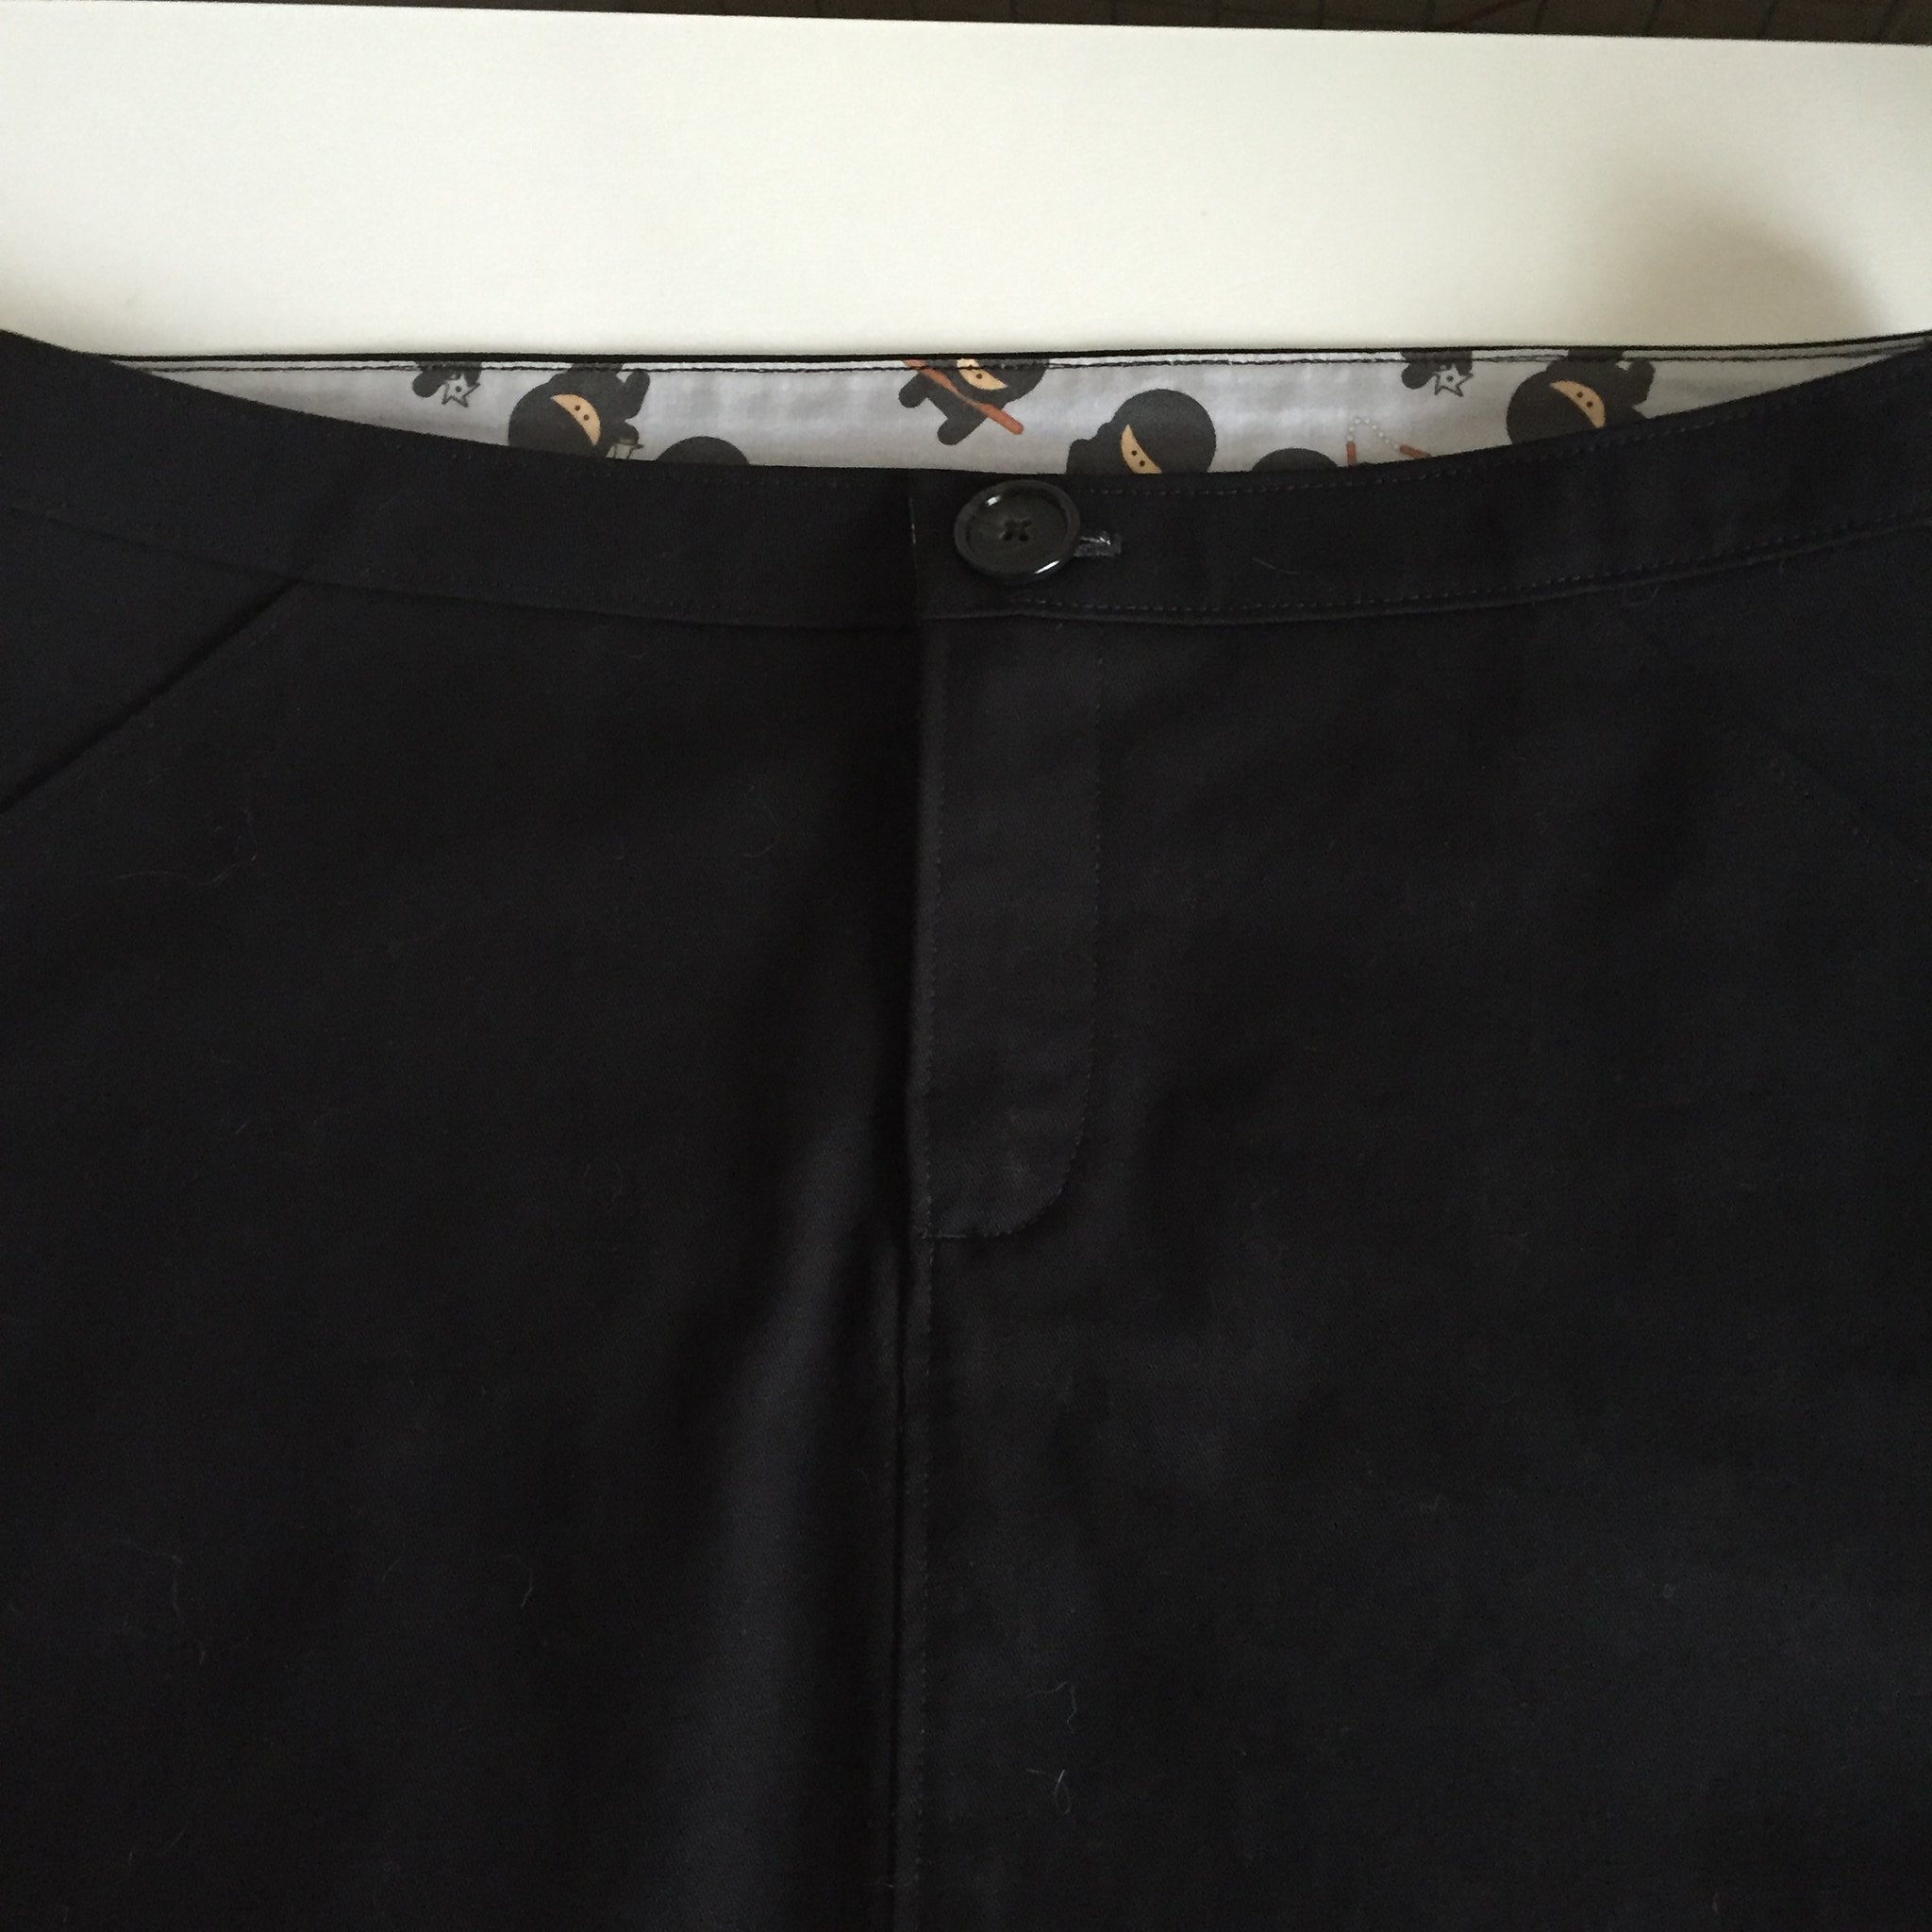
Since my fabric was a pretty serious twill (I’d guess somewhere between medium and heavy weight), I decided not to use it to line the pockets or for the waistband facing.  Instead, I grabbed some quilting weight scraps from my chevron quilt.  I started with a batik and used that for the pockets and the fly shield, but then I didn’t have enough of that print for the waistband facing.  Like any sensible person would do, I decided to use some of my leftover ninja fabric from Spoonflower (hence, the name of the skirt).  Also, while using black thread in my serger would have been the logical choice, I went with gray to match the lining fabric, the ninjas, and because I knew it wouldn’t show through the black fabric.  It’s kind of a party on the inside of this skirt!
image
I did a ton of topstitching on this skirt, partly because I love topstitching, and partly because I knew it would look great on this plain black skirt.  (Unfortunately, black topstitching on a black skirt isn’t super visible in photos.)  I sewed each seam, serged outside the seam line (just enough to trim the edges a bit), and then pressed the seams to one side where I topstitched them down.  Those babies aren’t going anywhere!
image
I used a metal zipper because with the weight of this skirt it just made sense to use a zipper that meant business.  The fly wasn’t hard to do, I just took it very slowly and used lots of pins and my trusty fabric glue to get everything in the right place.

Once I had the whole skirt all finished except for the hem, I started playing with the length.  I decided to document the different lengths, so I could make length decisions faster on future Moss skirts (yes, there will be more).  To start with, I folded up the hem (on the outside, with pins on the outside so I didn’t stab myself) to the place it would be if I had cut it out and finished it exactly as the pattern called for.  Then I took some really awful selfies in the bathroom mirror - both front view and side views, and added text to each photo.  I now have a hideous collection of pictures of this skirt at the original pattern length, pattern +1 inch, pattern +2 inches, and pattern +3 inches.  (No, I will not share them with the blog.  You’ll have to make your own bathroom selfies with this skirt.)  Then I made some notes on the envelope where I keep the pattern pieces and next time I’ll reprint the skirt front and back pieces and only add in the measurements I need.  I decided to make this one the pattern +1 inch length and will probably wear it with tights.  I think for a warmer weather version, I would make it pattern +2 inches.  It’s still a short skirt, but not so short that I can’t bend over without flashing everyone.  Also, I’d like to give a little shout out to the back yoke section of this skirt.  It raises the back of the skirt just a bit and it sits perfectly close to my back - no gaposis, no mooning!  As anyone knows who’s ever worn low rise jeans or skirts, this is a concern.  (Sorry Mom!  That sound you all hear is my mother beating her head against her table - she tried so hard to make me ladylike and here I am discussing mooning people on the Internet.)

I totally plan to make this skirt again (and again, and again…)!  I’ve got a white cotton pique (woven, not knit) that will be awesome in this for the summer and I’m thinking about an army green twill with black topstitching, and maybe one or two in linen for summer.  I’d also love a few of these in corduroy for fall and winter.  If I get cocky, I did find a pewter velveteen that would be amazing, but I’m not jumping straight into velveteen.

I realized that I probably shouldn’t bother too much with sewing for winter right now because I’m not going to be able to do much Me stuff until after the end of the year (hello Loopy Academy knitting, Loopy Academy sewing, Christmas knitting, Christmas sewing), and winter pretty much clears out of here around Valentine’s Day.  If I was smart, I would start sewing for spring and summer in January, and then start sewing for fall and winter in July.  Then I would have the things to wear in time to wear them.  We’ll just have to see if I’m smart or not!

Did I mention there are ninjas in this skirt!

Labels: ,

Friday, November 20, 2015

If a Unicorn Needed a Backpack...

image
…I think this one would work!  This is my drawstring bag project for Loopy Academy’s sewing version.  I started with the String Style Backpack pattern from Sew4Home.com.  If you’ve never checked them out, they’ve got tons of free patterns for all kinds of things, as well as tutorials for specific techniques - they’re worth a look.

Being Melanie, I did make a few changes to the original pattern.  I wanted a larger bag than the original and I wanted to box the lower corners.  I added two inches to the length AND width of the Exterior, Lining, and Pocket pieces, and I added two inches to the width only of the Casing pieces.  This gave me a slightly larger bag, with room to box the lower corners by two inches.  Boxing the corners meant I had to figure out another way to attach the lower strings.  I solved that problem by making small tabs with grommets and inserting them into the seam when I boxed the corners!
image
Obviously I added some appliqués to the front pockets, but I also decided to skip the fusible fleece and just used interfacing for the entire bag.  (The photo below was taken before I threaded the drawstring through, but you can see the locker loop peeking out at the top.  Do unicorns have lockers?)
image
On the inside of the bag there’s just as much of a party going on than the one on the outside!  I added a zipper welt pocket because pockets are fun, and I used a third print inside the pocket!
image
The front has a total of four slip pockets and two of those are pretty deep, but I can still easily get my hand all the way to the bottom of them.
image
The pattern called for using Fold Over Elastic (FOE) to edge the tops of the pockets, but I used some bias binding instead - it was easier to find the right color locally.
image
I’m really happy with how my bag came out.  It’s a very happy bag and it’s plenty big for a sweater.  I’ve got Dexter in it now and there’s still room to spare for my iPad.  I’m pretty sure I could easily get a worsted weight sweater in progress in there.  This was a fun project and the directions were very straightforward.  I had to do some extra thinking but that was due to the changes I made.

Have a great weekend!

Labels: ,

Thursday, November 19, 2015

A Little Bit More

image 
I’ve gotten some more knit on my Dexter!  You can see the texture of the yoke better in this picture than the one I had for Monday.  This is total autopilot knitting - stockinette with a wonderful yarn and I don’t even have to count rows because there’s only one body.  Perfect for the end of the day, with Max in my lap and something silly on TV.  I love knitting like that!

Labels:

Wednesday, November 18, 2015

Spinning

image 
I’ve gotten a bit more spinning done on my Aguas.  In the past, I haven’t really enjoyed spinning Merino, but I’m enjoying this.  Either I’m a better spinner or I have it opened enough that the spinning is going easily.  I’ve still got a lot more to spin on this, but I’m just fascinated by watching the colors change from green to blue green to dark blue green to grayish green and so on.  Easily amused!

Labels:

Tuesday, November 17, 2015

Loopy Academy

image 
I’ve started my second mitt! I finished my first mitt except for the thumb and cast on for the second mitt.  I’m working the beginning and end in twisted rib to keep it from being stretched out, and on size 1 needles (2.25mm), it’s very, very slow!

I’m past that beginning now and have started cabling on the second mitt.  This is my last Loopy Academy knitting project for this semester, then I can really focus on the sewing projects!

(Also, I’d like to apologize for the weird picture.  It’s dark and rainy outside right now and it hasn’t been sunny in days.  I think we might get some sun later today or tomorrow though.  Fingers crossed.)

Labels: ,

Monday, November 16, 2015

Dexter

image 
There was a second restart last week, in addition to my mitts for Loopy Academy.  As I was working on my Princess Fiona pullover in Pashmina in Ink, the yarn kind of mentioned that it would love to be a cardigan instead of a pullover.  It wasn’t causing trouble as a pullover and my gut wasn’t telling me to frog, but the yarn seemed to think that it would get more wear as a cardigan than a pullover.  So, Friday afternoon I frogged what I had and restarted to make a Dexter.  This is another pattern by Isabell Kraemer, who wrote the Ravello and Alpengluehen patterns.  I like pretty much all of her designs and I like the way they fit.  I had planned on making a Dexter out of some pink yarn, but I’m apparently going to have an Ink one too.

I made it past the separation of sleeves from body by the time The Walking Dead started last night, so I’m to the easy part now.  I don’t have buttons, but I found some possibilities on Etsy last night that I’ll probably order today.  This isn’t Christmas knitting or Loopy Academy knitting (or sewing), which is what I really should be working on, but it is fun to knit.  Pashmina is always fun to knit!

Labels:

Wednesday, November 11, 2015

Binding

Do you remember that black and gray chevron quilt I made?  Well, it’s all quilted and it’s supposed to be here later today!  Yesterday I cut binding.  I’ve still got to sew it together and I didn’t bother taking any pictures of the binding strips because, well, they’re black.  Not very exciting at all.

Also, I forgot to mention that I’ve started Christmas knitting and it’s not bloggable.  This means that I won’t be blogging quite as regularly as I usually try to until I’ve finished the Christmas knitting.  On the other hand, I still have to finish knitting my mitts for Loopy Academy, and I haven’t really done much of anything for Loopy Academy’s sewing version, so there are definitely some bloggable things in the works.  I’ll pop in when I can, and Logan and Max have volunteered to occasionally help out here on the blog, but I didn’t want anyone worrying that my gall bladder had grown back or something (may it burn in a fiery medical bio-waste inferno for all eternity).

Labels: ,

Tuesday, November 10, 2015

Loopy Academy, Cables

image 
After my decision to change gears with the cables project, I cast on and began knitting Paraphernalia socks (or so I thought).  I’ve knit this pattern before and I really like the finished socks.  The cable is large, but it’s only on one section of the sock (the rest is just ribbing), so I don’t have to really think for the rest of the sock - just what I needed.  As I was knitting along, I was admiring how much quicker this pattern was than my first choice, and I put the sock over my hand to spread it out a bit and look at the cable.  The next thing I knew, I was figuring out where to put a thumb gusset and had knitted one!

I changed gears again!  So, instead of socks, I’m knitting a pair of Paraphernalia mitts.  I’m pretty sure these will be my cable project.  I’m feeling the knitting love with these!  As you can see in the photo, I’m just about finished with the first mitt and then I’ll just have to repeat things for the second!  (I use round counters obsessively and take notes, either on paper or in knitCompanion, so the second mitt/sock/sleeve is always faster than the first.)

Labels: , ,

Friday, November 06, 2015

A Change of Plans

OK, remember yesterday’s blog post - the mitts for my cable project?  Well, I was knitting on them last night and I realized that the charts were taking way too much concentration on my part.  Things are kind of crazy around here right now, and I know they’re going to get crazier before the year is up, and while I love the look of those mitts, they’re just too much for me right now.

I frogged the knitting last night.  I’ve changed projects for my cables, but I’m not ready to tell you what it is until I’m sure it’s what I’m going to do.  I’m reserving the right to change my mind again if I need to.  Hopefully Monday I’ll have some progress to show!

Have a great weekend!

Labels:

Thursday, November 05, 2015

Loopy Academy, Cables

image 
The last project for Loopy Academy Knitting this semester is the cabled project.  Knitty came out with the Resonator cabled mitt pattern right around the time this semester was beginning, and I decided that they were perfect for this assignment.  I’m using Malabrigo Sock in Natural for these because cables look great in light colors.  I need them to be smaller than the small size in the pattern, so I’m using smaller needles than called for.  Hopefully this will work, and I’ll use the required yardage.  If I come up short, I might have to add pom poms!

Labels: , ,

Wednesday, November 04, 2015

Loopy Academy, Knitting, Pillow

image
I’ve finished my Sea Oak pillow!  I’m happy with how this came out, and it’s my first knitted pillow! So far, I think Max is the only one who’s noticed it.

I used Cascade 220 Heathers in color 9452.  This is not the super wash version of Cascade 220.  I knit it on US 4’s (3.5 mm) because I wanted it to be tightly knitted so the pillow form didn’t show through.  It worked.  I didn’t worry about gauge because I didn’t buy my pillow form until I’d knitted the cover.  When I had knitted about half of the front, I measured the width of the knitting and knit the front to that length (14.5 inches), then I adjusted the size of the second back piece accordingly.  I bought a 16 inch pillow form because I believe all pillow forms should be slightly larger than their covers.  It’s a deeply held belief that results in puffy, fluffy pillows.

The only knitting project I have left for this semester of Loopy Academy is the cables project.  I’ll show you that tomorrow!

Labels: ,

Tuesday, November 03, 2015

Loopy Academy Sewing Progress

image 
I appliquéd the decorative hexagons to the pockets of my drawstring bag over the weekend.  I played around with a couple of different stitches, but ended up with a narrow satin stitch, using thread that matched each hexagon.  Once I figured out what I was going to do and got the settings adjusted on my machine, the actual appliqué went very quickly.

I’m hoping to get the rest of the cutting for this project done later today, assuming that today is a better day for cutting than last week was.  Once I’ve got everything cut out, I can begin the actual construction of the bag.  I don’t think sewing it up will take too long once I get going.

Labels: ,

Monday, November 02, 2015

Treat, and a Trick?

image 
I finished my Treat shawl and got it blocked over the weekend.  This is a completely reversible shawl.  I knit it in Dream in Color’s Jilly in the Wineberry color way.  I used two skeins so my Treat is bigger than the one in the pattern.  (I used just over 700 yards for mine, and worked 25 repeats.)  This was a great project, and I’m kind of sad that’s it’s over.  I would definitely knit another one or two!
image
Here’s a close up and you can see the texture of the rib and the lace.  One of the nice things about this pattern is that it’s easy to memorize, so once you get a feel for what’s going on, you don’t really need the chart and you can just knit it.
image
Oh, and the trick?  Well, this morning after my run, when I was doing my cool down I saw this rather large lady sitting in the middle of her web.  She was doing some sort of spidery business, but when I stuck my iPhone up close, she sat still and smiled for the picture.  I’m assuming she’s a she, since female spiders are bigger than the males.  If she’s a he, I don’t want to see how big the female would be!

Labels: ,