A Little Detour
Today's post is about sewing! I've been wanting to do some more sewing and have been working on straightening up my sewing room some because I hate sewing in a mess. I can only work for little bits at a time because Logan can't come into the sewing room since The Babette is spread out in the middle of the floor. I have a child gate across the doorway, so he can see in, but I don't need his assistance with The Babette. Unfortunately, Max just jumps the gate and he is only partially cooperative. He likes to check everything out (the sewing room makes him purr), but then he starts causing trouble. He bites things, attacks things, wants to see the sewing machine needle up very close, and basically just isn't trustworthy in there. So, little bits at a time, I get things straightened out.
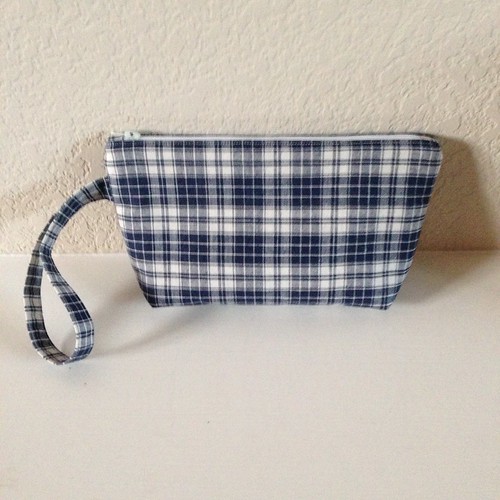
Over the weekend, I decided to make a little wristlet pouch with some stash fabric. I used the Elizabeth Hartman Wristlets Three Ways pattern, since I'd bought it ages ago from Pink Chalk Fabrics (it doesn't seem to be available right now). The pattern has 3 different styles, each in two sizes - I made C1 if you care. The pattern directions are very well written with good photographs of each step and you only need to use a straight stitch on your machine.
I lined it with a navy and white floral, but did the little inside pocket in the plaid. I have no immediate plans for it, but it's cute and I might use it to corral my knitting notions. Its big enough to hold a couple of 50 gram balls of fingering weight, but a single 100 gram ball would be too fat, so it could work for socks or mitts as a project bag. For now I'm just admiring the little bag and trying to keep Max from stealing it.
Stay tuned, I'm planning some more sewing projects this Spring!
Labels: sewing


4 Comments:
Love it! Very cute with coordinating fabric inside. I'm always impressed with anyone who can add a zipper like that. I've made clothes in my past, and certainly used zippers, but all tucked in like that, I just can't seem to get it to look nice.
Still waiting to see more on the Babette, now that you've mentioned it....!
I think I found the pattern at http://www.pinkchalkfabrics.com/index.php?main_page=product_info&cPath=39_75_255&products_id=8139
I really want to know how to make the zipper look so perfect!
I'm also very impressed with the zipper!
If it's the same pattern as Elizabeth's Perfect Zip Bags, here's a direct link from her Oh, Fransson! blog:
http://www.ohfransson.bigcartel.com/product/perfect-zip-bags-pdf-sewing-pattern
You did a perfect job - very nice!
Post a Comment
<< Home