Oasis Finale!
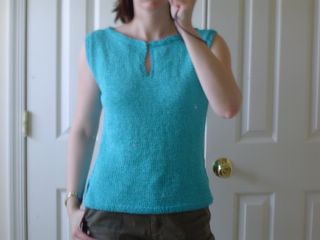
Here it is. The shot made famous by knit bloggers everywhere, The Headless Bathroom Mirror Self Portrait! Oasis is finished and I'm thrilled with the way she looks. Someday in a thousand years or so, anthropologists will be trying to explain the cultural significance of the Headless Bathroom Mirror Self Portrait (I mean as many of us that use it, it must mean something!) and it will be interesting what they say about it. Personally, I've found that when I give Caleb the camera, I tend to look like I have a double chin looking down at the camera at his level and Mickael is at work. Until the cat or dog learn to use digital cameras, I'll get my own shots in the bathroom mirror, thank you very much. OK, I promised the mods to the original pattern when it was done and its designer, Joan McGowan- Michael has generously agreed to let me share with you. First, you have to go get the original pattern here. Go ahead, I'll still be here when you get back. Got it? Great. Next you need to know that the mods, exactly as I've written them are for the smallest size, the 36" finished bust. Personally, my own front porch is 33" so there is a nice amount of ease here. The top in this size could easily accommodate a larger front porch area and still look great. Those of you that are more boobalicious, will have to adjust the mods according to the size you are making. OK, here goes: Cast on the number of stitches called for in the pattern and work 6 rows in seed stitch. On row 7, work the first 4 stitches and the last 4 stitches in seed stitch and everything in between in stockinette stitch. Continue like this until the piece measures 3". Notice that I did not follow the short row shaping for the curved hem as called for in the original pattern (very cute, just not what I want here). When you have worked 3" total, switch to stockinette stitch all the way across the row. When work measures 3 1/2" from cast on edge, begin side decreases as called for in pattern. Continue following pattern through all the decreases and the increases. Work evenly until piece measures 14" from cast on edge. Start armhole bind off and decrease as called for in pattern. After final armhole decrease, work evenly for 1", ending with a WS row. Next row: K33, P1,K1,P1, join another ball of yarn, P1, K1, P1, K33. Continue working evenly, both halves of the neckline, keeping the 3 stitches at the center on each side in seed stitch and the rest in stockinette, until piece measures 6" from armhole bind off. From each neck edge, bind off 12 stitches on the next two rows, then 6 stitches on the following two rows. Bind off 3 stitches on the next two rows and 2 stitches on the following two rows (8 rows worked with bind offs at the neck edge). On the next right side row, decrease 1 stitch each side at neck edge - 12 stitches each side. Continue evenly until armhole measures 8" from first armhole bind off and bind off shoulders. For the back: Follow the directions for the front exactly through the armhole shaping. Instead of dividing work for split front, continue knitting evenly (72 stitches) until piece measures 6 1/2" from first armhole bind off, ending with a WS row. Next row, K18, join a new ball of yarn, BO 36 sts, K18. Then, at neck edge, bind off 4 stitches each side on next two rows, and then bind off 2 stitches each side on following two rows (12 stitches each side). Continue evenly until back measures the same as the front. Sew shoulders and side seams. Then, using a smaller needle than the one you used for the body, pick up stitches along armholes and neck (not all at once, of course) and work 4 rows/rounds of seed stitch, then bind off purlwise. When I pick up stitches, I pick up 3 stitches for every 4 when the stitches I'm picking up are perpendicular the ones I'm picking up from. I hope all of this makes sense. If you have any questions, just leave a comment and I'll get back to you. ENJOY!
posted by Melanie at 9:20 AM
![]()


0 Comments:
Post a Comment
<< Home