<body><script type="text/javascript"> function setAttributeOnload(object, attribute, val) { if(window.addEventListener) { window.addEventListener('load', function(){ object[attribute] = val; }, false); } else { window.attachEvent('onload', function(){ object[attribute] = val; }); } } </script> <div id="navbar-iframe-container"></div> <script type="text/javascript" src="https://apis.google.com/js/platform.js"></script> <script type="text/javascript"> gapi.load("gapi.iframes:gapi.iframes.style.bubble", function() { if (gapi.iframes && gapi.iframes.getContext) { gapi.iframes.getContext().openChild({ url: 'https://www.blogger.com/navbar.g?targetBlogID\x3d10582443\x26blogName\x3dPink+Lemon+Twist\x26publishMode\x3dPUBLISH_MODE_BLOGSPOT\x26navbarType\x3dBLUE\x26layoutType\x3dCLASSIC\x26searchRoot\x3dhttps://pinklemontwist.blogspot.com/search\x26blogLocale\x3den\x26v\x3d2\x26homepageUrl\x3dhttp://pinklemontwist.blogspot.com/\x26vt\x3d4292445769315597913', where: document.getElementById("navbar-iframe-container"), id: "navbar-iframe" }); } }); </script>

Wednesday, March 31, 2010

Yesterday

Yesterday this showed up in our house:

DSC04008
Yes, it was my birthday! Caleb and Mickael picked out this cake for me (after a brief discussion of a Batman cake) and I think it's just perfect. First of all, it's chocolate. Second, check out the princesses! Cinderella is my favorite movie ever, Aurora (Sleeping Beauty) had some issues with a spinning wheel, and Belle (Beauty and the Beast) is the first brunette princess! (Snow White had black hair, not brown and is probably my least favorite Disney princess.) I know it probably killed Caleb to pick out a princess cake, but I thought it was really sweet. Oh, and guess what? Cinderella's skirt lights up! Because it's not a truly happy birthday until a princesses' skirt lights up. Or something.

I also have to show you what Mickael and Caleb got me:

DSC04009
A whole box full of Brown Sheep Cotton Fleece! I'm going to do a Hexagon blanket after I finish The Babette and that's what these are for. There are a couple of other colors I want to add to the pile but this gives me the majority of the colors I need. (I've tucked in a couple of partial skeins I had in my stash from previous projects too, that's why there are some smaller looking skeins on the left.) For now, I'll just stare at all the pretty colors in the box until it's time to start the blanket!

Labels:

Tuesday, March 30, 2010

More Babette Squares

DSC04002
The Babette continues! This is half of the squares for the next size down (from the last set of squares you saw - got it?) I've got to weave in the ends, but I'll probably finish the other half of this size before I fool with weaving the ends in. I'm working the ends in as I go where I join a new color, so that only leaves the beginning and ending ends for each square that have to be woven in.
Can I just say that working on The Babette has been so great! I mean, yeah, there's only the one stitch (double crochet US) that I have to deal with, which is so nice since it's the only crochet stitch I know. But also it's a great project to pick up and put down. The blocks are small enough that they don't bash Ramius in the head if he's sitting in my lap (the biggest ones were a bit of a problem, but not like being bashed by a sock), plus I get to change colors randomly and my tote bag full of colors is just so fun looking. I may have to do another Babette someday because I'm really enjoying this one.

Labels: ,

Monday, March 29, 2010

Stash Enhancement and Lump Birds

DSC03998
On Friday Mom and I decided to go shopping! We are slowly working our way around the yarn stores here in the DFW area and Friday we hit The Shabby Sheep and The Woolie Ewe. Both were lots of fun and some things came home from each store. We started at The Shabby Sheep which is in a small house in downtown Dallas. The size of the shop didn't really look very big outside, but they have packed it full to bursting with yarns, books and all the little notions and accessories we knitters are suckers for. Great customer service rounded out our shopping experience and we will definitely go back there! I got a skein of Blue Heron Rayon Metallic yarn (the one in the center above) which will probably be used for a pattern design I'm bouncing around in my head, and two skeins of Spud and Chloe Fine in Glow Worm (on the right above), which might also become a pattern design. I had never seen any of the Spud and Chloe yarns in person, only on the Internets, and the colors are just as lovely in real life. I'd love to use some of their Sweater yarn (worsted weight) for something. Also, their little logo is just great. I could just squeeze that fat little sheep!

After a quick lunch, we were off to The Woolie Ewe. I had been there before but Mom had never been before, and of course, it's filled with yarn , so it's lots of fun. Driving between the two shops, I realized that I would need something to put borders on The Babette and luckily for me, The Woolie Ewe has Spud and Chloe too, so I picked up 3 more skeins of Fine in Sassafras (on the left in the picture) - two for the actual borders and one to use in some of the blocks. I have used two other pinks that are very similar in the blocks and I think this color will edge it all nicely.

DSC03995
Saturday night, the lump birds* got weird again and plopped down (and "lumped") on the back patio this time, for several hours. There was no snow (yeah!) and what's strange is that they aren't anywhere near the bird feeder. Usually when they lump, they lump by the bird feeder (thus getting in the way of any birds who actually want to eat) or on the fence - probably safer than lumping on the ground. I don't know if the weird lump bird behavior will continue every weekend (or why they get weird on the weekends), but I'll keep documenting it on the blog.

*The lump birds are actually Mourning Doves, but since they tend to plop down in the way of the bird feeder and park themselves, Caleb decided (as a toddler) that "those birds are just lumps." Lump birds they are!

Labels:

Thursday, March 25, 2010

Finn's Day

DSC03991
Look deep into my eyes, you want to send me bacon. Baaaaaacoooon!

Oh, never mind, I have no Jedi powers. Mommy said I could blog today since it had been a long time since I had blogged and I didn't even have to share the blog with the cat or wear funny knitted clothes! She said that Spring is here, but I don't think she knows what she's talking about because we had more of that yummy white stuff over the weekend. I have noticed more bunnies in the yard lately though. Bunnies make me feel all wiggly inside and I just know that the bunnies would be so fun to play with. Why do they run away from me? I would share my squeaky toys with them. I bet bunnies are nicer than cats. Ramius let me sniff him the other day, but then he walked off. Once we had two extra cats staying with us but they didn't even let me sniff them. Mommy said they were Grandmommy's cats but I bet they tasted just as good as Ramius does. Grandmommy likes me, I bet she would have let me snarfle her cats. Do you get to snarfle cats? Have I ever taught you how to snarfle cats? It's easy, here is a small tutorial:
  1. Find cat.
  2. Get close to cat.
  3. Bury your nose in cat's fur and inhale deeply.
  4. Exhale into cat and repeat from step 3. (It works better if your nose is wet and sometimes you might have to hold the cat in position with your paw.)
With a little bit of practice you'll get it! So I think Mommy is confused, she said she was going to treat the weeds in the backyard today. Why do the weeds need treats? When is she going to treat the dog in the house? She cooks bacon for Daddy and Caleb, why not fix some for Finn? If those weeds get bacon, I'm playing with my squeaky toys in the middle of the night. Oh, guess what? We got a bird feeder since the last time I blogged. I like the bird feeder. Now we get birds and they sit on the window sills in the breakfast room and on the patio and sometimes they make a mess with the bird food, and then when I go outside, I eat it. Bird food is yummy, but birds don't get bacon. Mommy tells me it's not there for me, but I think it is. The birds haven't told me they don't want to share. Oh, you know what else? Mommy says the lizards are back! We have a couple of giant lizards (Mommy calls them crocogators) that live in the front flower beds and apparently, they make baby lizards. (I asked her about this once and Mommy says its the birds and the bees, but she's clearly losing it because I asked about LIZARDS. I hope Mommy will be OK.) Well anyway, last year we got baby lizards in the back yard and there was one baby lizard that used to spend the night on the window screen of one of the breakfast room windows and Caleb named him Lightning Larry Luciato. He was a really pretty lizard, all grey and black and white and when you poke him with your wet nose, he'd jump and kind of freak out. There was another lizard that lived in one of the geranium pots, but he didn't get a name. He'd jump too when you goosed him. I like making the lizards jump. Ramius isn't nice to lizards. At my Nanna and Papaw's house the lizards sometimes get into the house and Ramius eats them. I'm going to keep all the lizards here outside so Ramius doesn't get them. I better go now, I'm not sure what Mommy is doing and I think someone should keep an eye on her. It's better not to leave her alone for very long.

Labels:

Wednesday, March 24, 2010

New Yarn!

Since I finished spinning the red BFL singles last week, I got out the grey Polwarth singles that I finished spinning ages ago, to ply. Here's what I ended up with!

DSC03987
288 yards of 3 ply. While the spinning wheel portion of making this yarn is finished, it's not ready to use just yet. At this point it looks a little over plied which is typical when you ply aged singles, but once it hits water, the twist in the singles will re-activate and balance the plying twist. Also, the yarn is a heavy fingering weight to a sport weight size. When I finish the yarn, I will full it (do this with fine wools, not long wools*) by tossing it in the washing machine and letting go through a delicate cycle - keeping the wash and rinse water the same temperature. This will cause the crimp in the fibers to push against each other, making the yarn fluffier and "fatter" than it is now. Finally, while sheep's grey looks great on sheep, it's too warm of a grey for me to wear - it makes me look dead. So the yarn will have to be dyed. Since I'm going to be dyeing it anyway (haven't decided which color yet) and that involves water and washing, I'll take care of the other finishing details at the same time. Until I figure out what color I want and actually find some time to do the dyeing, it will just wait for me.

*If you attempt this with long wools, your yarn will felt. If you're not sure what wools need fulling and what wools should be left alone, check one of Judith MacKenzie McCuin's books. She has also written an article in Spin Off Magazine on fulling yarns, but I don't remember which issue. Off the top of my head, I'm not remembering enough to feel comfortable telling you much more because if I tell you wrong and you ruin your yarn, you're not going to be too happy with me.

Labels:

Tuesday, March 23, 2010

Zipping Along With The Babette!

DSC03959
I've now finished all the blocks that are the third from the biggest size! The top two are the new ones. Since there are a total of six different sizes of blocks in this blanket, and I've done the three biggest size, if you only look at block size (not block number), I'm halfway done. Maybe. OK, really I have a long way to go because the smaller three sizes of blocks have SO many more to do of each size. But they're small. And cute. And fast. And that has to stand for something, right? I still haven't started blocking any of them, but I'll get to it eventually.

Labels: ,

Monday, March 22, 2010

A Strange Weekend

DSC03957
This was the last weekend of Caleb's Spring Break and I wanted to surprise him. His favorite color is red, so when I found this Red Velvet Cake recipe a couple of weeks ago, I knew I'd want to make it for him. I've never made a Red Velvet Cake and to be perfectly honest, I don't know if I've ever even had a piece to eat, but the gorgeous color (and the fact that it was cake) lured me in. Here it is all finished. I'm not a professional (or even an amateur) cake decorator, but I can do little fluffy swirly things with frosting!

DSC03967
And here's what the inside of the cake looks like. Which of course made me realize that this would be the perfect cake for a True Blood season premiere party. (I guess you could use it for a Twilight party too, if you're into vampires that don't have fangs and sparkle*) Oh, and Caleb, who I made the cake for? Didn't like it. I think he might be part cat - the more work you put into something, the less he's interested in it. I thought it was great and the frosting is to die for - of course anything with two sticks of butter, a brick of cream cheese and enough powdered sugar to turn the entire kitchen white is a winner.

DSC03963
To continue the strange, we had snow here again. Around 2 inches of snow. I don't know what the date is where you are, but it's late March here and this is the Dallas area. Snow isn't really in season right now. I didn't get a picture of it before it melted, but we had lump birds, puffed up to the size of small chickens, sitting by our front door for hours. I don't know what they were doing there, maybe it was out of the wind, but it was a little creepy looking out the door (we have a window in the door and I took this picture through that) and seeing the lumps, just sitting there. Very strange. It was a good thing the Porch Dragon was out there, protecting us. Fortunately, Caleb didn't want to chase them this weekend.

*I've read the Twilight book and didn't really enjoy it. I actually thought the movie was better, but found the sparkles and no fangs thing a little disturbing. I'll probably continue watching the movies of the series because it is a vampire series (and I love vampire movies), but I think if it came down to Sheriff Eric and Edward, Mr. Sparkles is going down. Just my opinion, and this is all fictional of course.


Labels:

Friday, March 19, 2010

Next Size Down, Done!

DSC03954
I've now completed all of the second to biggest size square for The Babette! Yes, there are only 4 of them total. The top two are the new ones. I think I'm going to start blocking them this weekend because I think they'll go together easier if they're blocked and it will take some time to get all these blocks, blocked.

Yesterday we went to the Dallas Museum of Nature and Science (AKA Ricky and Mindy's Museum*) to see the Science of Spying exhibit. I don't know if this museum is strictly a children's museum, but they are definitely a hands on kind of museum and this exhibit is no different. (In contrast, the Spy Museum in Washington, DC is less hands on, more stuff in glass cases, and more geared towards an older audience.) Caleb got to play with interactive stuff, based around spying and had a blast. For example, at one point he had to choose between three possible sites for a meet with another spy and he was given information on the amount of people in the area, the amount of video surveillance, and the number of exits to choose which site would be the best. Of course we also went through the regular exhibits and played with all of those things too. It was a fun day for everyone.

Have a great weekend!

*A few years ago (Caleb was 4 or 5), we came to Dallas to visit Rick and Mindy and they took us to this museum and as luck would have it, it was reptile weekend. There were snakes and lizards and frogs and all kinds of things all over the museum. Caleb thought it was great and has since called the museum Ricky and Mindy's museum. I didn't realize we were going to the same place until we walked in and I recognized it - no reptiles this time.

Labels:

Thursday, March 18, 2010

Spinning

DSC03950
I finished up the BFL singles (these were started before the Olympics). I'll have to wait a little while before I can ply it because the first bobbin and a half were done so long ago*. Fortunately I've got the grey Polwarth to ply in the meantime. Ramius doesn't look too impressed either way, does he?

ETA: Ooops, I forgot the picture! Also * when you have previously spun singles that have been sitting, the twist is less active than freshly spun singles. If you try to ply the two together, it's very difficult to get them plied nicely. If you let the fresh singles "age" a bit, I think it's easier.

Labels:

Wednesday, March 17, 2010

Recognize this?

DSC03945
It's the Cassidy fronts. I've now started the armholes and I feel like I can see the light at the end of the tunnel on these fronts. I think I started this sweater back before Thanksgiving and here it is, still lurking in my knitting basket, waiting for me to finish it. It probably won't get worn around here until Fall at the rate I'm going with it. I could wear it today or tomorrow, but clearly, it's not ready yet, and we're probably quickly running out of sweater (long sleeved at least) weather.

This week is Spring Break (which is why the blog posts have been a little all over the place time wise) and Caleb and I have been having little adventures. Tomorrow we're going to have a big adventure with Mickael, but I'll tell you about it afterwards.

Labels:

Tuesday, March 16, 2010

The Babette

DSC03944
Thanks for coming to check out the group! We were over 100 members last time I checked, so the crochet bug must have bitten a lot of you.

I've done some more blocks for The Babette and I've got a plan for finishing all the blocks. See the big block on the top left and the block-in-progress on the lower right? Those are (will be when they're finished) the biggest size of block. In fact, those are the last two of the biggest size of block. Then I will finish all of the next size and so on, until I get to the smallest size. Since the bigger blocks need more of a variety of yarns, I think that by doing those first, I'll have enough different yarns to make them interesting. Then when I'm on the tail ends of the yarns I'll be doing the tiny little blocks which take hardly any yarn at all.

This plan should also make me feel like I'm accomplishing something on The Babette instead of just wandering around aimlessly making blocks.

Labels:

Saturday, March 13, 2010

Crochet for People Who Don't!

It's up and running! If you're interested in the new group, come check it out and see if it's right for you! We've had four very generous volunteers offer to help me moderate and I had two volunteers offer to help with the badge and banner, but then I started messing around on my computer and came up with a badge and banner all by myself. I really appreciate all of the offers to help out and I hope this is a fun place for everyone who's interested in doing a crochet project or two without learning all the ins and outs of it.

Labels:

Friday, March 12, 2010

Tidbits

I don't really have anything to show today. I piddled around on several things yesterday and then Finn decided to change the boundaries we've set about who gets to eat Ramius' food. Twice. So no real blog post today.

I would like to thank all of you who are interested in the crochet group idea. I'll post information here once it gets all set up so you can come join once there's something to join. Those of you who PM'd me on Ravelry about helping to moderate, I'll be contacting you back later today - thanks for offering to help, this is huge because I don't have time to moderate the thing all by myself!

I would still like to request help with the group's badge and banner. I'm not computer literate enough to come up with the images we need. If you can do this (you don't have to moderate the group also), please contact me on Ravelry (PinkLemon) and I'll get you the specs of the sizes we need (there's a badge for the group and a banner) and I can send you photos of the few pieces I've crocheted if that would help. Thanks so much. (ETA: We have a volunteer for this now!)

I hope you all have a great weekend and as soon as this is up and running, I'll give you all the details!

Thursday, March 11, 2010

Not Knitting and a Potentially Crazy Idea

DSC03940
I know, I told you I'd have knitting here today, but I changed my mind when I started making little, tiny squares for The Babette yesterday. Here are 5 new ones that haven't had their ends woven in yet. (By ends, I mean the beginning and ending ends. When I change colors I crochet over the ends to work those in, so I just have to trim them down.) I haven't checked my square count lately for The Babette, but I know I'm not there yet.

OK, I had a Potentially Crazy Idea the other day and the longer I think about it, the less crazy it seems. Ever since I started with a little crochet (the Star Flowers scarf), I've been getting comments from people who had never done crochet, never considered crochet, but seem to like what I'm crocheting - or at least the idea of what I'm crocheting - and are now at least thinking about possibly at some point learning which end of a crochet hook is the business end. On the other hand, I know what my WIP's pile looks like and I have an ever growing list of "want to do's" and I'm sure that most of you are in a similar situation and the idea of learning a whole new craft just seems silly. Is this sounding familiar to any of you?

I've mentioned before that while I am doing two crochet projects right now (The Babette and the Stripy Bag) and I've completed the Star Flowers scarf, I really only know how to do two or three things in crochet. (I can slip stitch, chain stitch, and double crochet - that's it.) For all three of these projects, that's all I've had to learn. Basically, I'm crocheting, but I don't really know how to crochet. I guess I'm like those people who learn to cast on and learn the knit stitch, but never learn how to purl so they crank out endless garter stitch scarves quite happily. If I want to make something that involves another stitch, I have a book that will explain it and I'll learn it when I need to, but for now, I'm happy with my extremely limited skills.

So here's the crazy idea. What if those of you who were on the fence jumped off with me and those of you who are in a similar boat (as far as crochet skills go) joined me and we all got together and formed a group for people who are crocheting, but don't really know how to crochet? I'm kind of thinking Ravelry would be the best place for the group, then we could link to patterns that only involve the limited stitches we know (who knows, we might never get beyond double crochet), we could share our favorite books that teach us the limited stitches we use, we could share links to online tutorials and You Tube videos showing us exactly how to make the stitches, we could ask the most Galactically stupid questions about crochet without fear because none of us really know what we're doing, but we could all figure it out together. It would be the blind leading the blind, but we'd have pointy hooks and yarn and it would be fun. We might even be able to con a more experienced crocheter into joining the group and then we could pick their brain and ask them questions (until they run screaming into the woods one day wearing nothing but their nightgown and a single cowboy boot at which point we'll have to trick another experienced crocheter into joining our group, but we can cross that bridge when we get there.)

Anyone up for this? I'd need a couple more people to help me moderate this thing and we'd need a banner and group tag picture thingy (there's nothing more sad than a Ravelry group with no picture - don't you think?) which I don't know how to make. If you're interested in the group, leave a comment. If you'd help out with moderating the group or could help with the graphics we'd need to make it look like a real group, PM me on Ravelry - I'm PinkLemon. If you think I'm out of my ever-lovin' mind, it's probably best you keep that to yourself, I've heard it before. So, Crochet for People Who Don't? What do you think?

Labels: ,

Wednesday, March 10, 2010

Stripy Bag

I'm glad that so many of you seem to have gotten something out of yesterday's post. Today's post is going to be very simple - look! A Stripy Bag!

DSC03938
I've now worked 8 stripes (16 rounds) of the side of the bag and it measures 6 inches from the bag bottom at this point. I'm not sure how tall I'll go on the bag - I figure I'll know when to stop when I get there. Caleb is already suggesting things to put in the bag - mostly his stuff and Ramius. I'm not sure why he wants Ramius in a bag - I'll have to keep an eye on him.

Just in case you were wondering why it's been 99% crochet around here since the Olympics ended, I needed to give my hands a break. Knitting the Franket, as heavy as it is, even with it sitting in my lap and as much of the weight distributed away from my hands as possible, I was starting to feel it in my hands. That's your first warning to take a break, so I jumped to crochet, which uses my hands differently. I think I'll bring back some non-Franket knitting tomorrow though.

Labels:

Tuesday, March 09, 2010

A Little Tutorial on Picking Up Stitches

Yesterday I got a comment from Yarndude asking how I've been picking up stitches for the Franket. We ended up emailing back and forth several times yesterday and I realized that this would be a great blog post to do because I think picking up stitches is something most books breeze over and don't really cover. I can't remember where I learned how to do it, but I'm guessing I learned from the Vogue Knitting book (it's upstairs right now though, I'm downstairs, and I'm too lazy to double check that right now). First of all, I'd like to give a disclaimer - there is more than one way to do this and I'm not saying my way is the only right way. What you're going for is a nicely picked up edge that goes in a straight line, is secure, and looks good. If you do it another way and you're happy with the way your technique looks, by all means keep doing it your way. This is my way and I'm happy with it, but use what works for you.

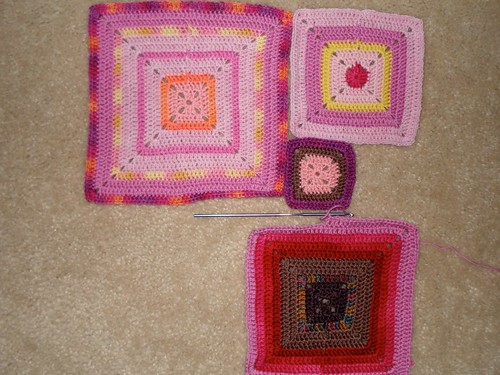
I've used the Franket to demonstrate, but for the most part the techniques are the same on the Franket as they would be on a non garter stitch sweater when you pick up for neck or front bands. The only difference would be the ratio of stitches when you pick up in a perpendicular direction from the original knitted section. If I were picking up for button bands on a non garter stitch cardigan (knitted either top down or bottom up) I would pick up 3 stitches for every 4 rows UNLESS the gauge of the knitting was 4 stitches per inch or less. Then I'd pick up 2 stitches for every 3 rows. For garter stitch, because it compresses so much vertically, I pick up one stitch for each ridge (1 stitch for every 2 rows).

I use the same size needle that I will use to knit the next square of the Franket, or in the case of a sweater, the same size needle that I'll use to knit the bands (which is smaller than the needle size I used to knit the sweater). I do not twist the stitches (knit through the back loops) on the first row of knitting.

Some patterns/books differentiate between "pick up" and "pick up and knit." Theoretically, "pick up" means to pick up the stitches already worked and put them back on your needle so you can then knit them. If you've ever tried this, you know that it gets very tight very fast and is a pain to do. Also, once you have them picked up, you're going to knit them anyway so why not go ahead and just "pick up and knit" in the first place and save yourself some time and sanity. Even if you're going to work a rib for your bands or any stitch other than stockinette, working the first pick up row the way I show below won't show on subsequent rows.

DSC03924
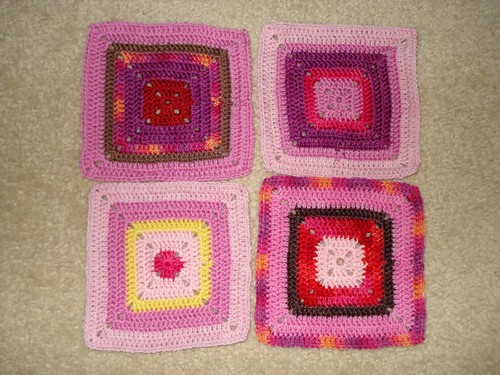
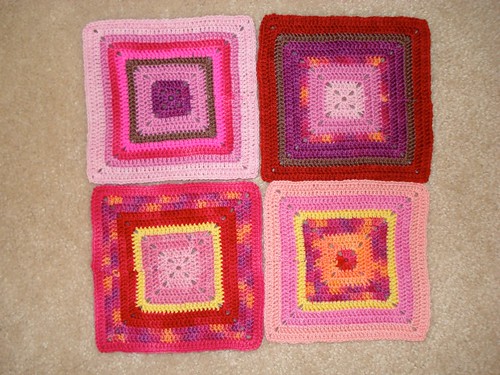
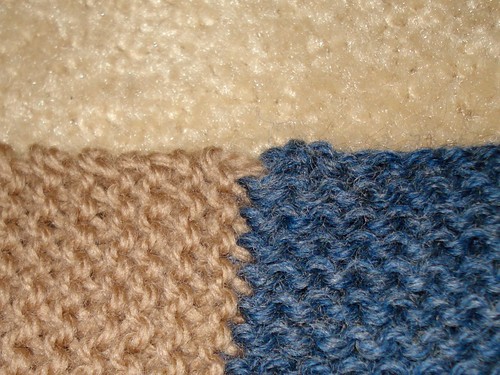
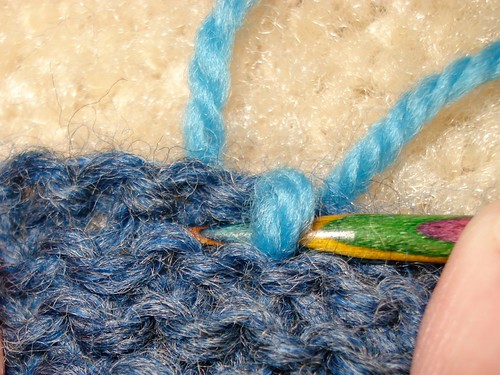
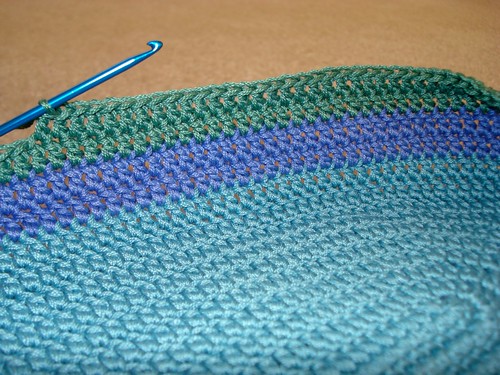
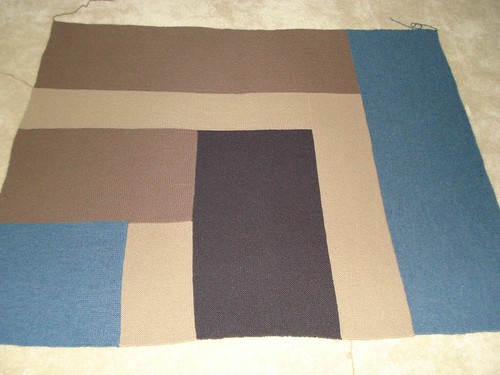
OK, let's get started. In the picture above, you see the joint of two blocks from the Franket. The blue block on the right has been knit paralell to the top edge. The beige block on the left has been knit perpindicular to the top edge. We'll be picking up and knitting along the top edge so what we want to do is make sure we pick up stitches evenly and in a straight line so we don't get a jog where the original knitting changes directions. Since the blue section is going the same direction as the new section we're picking up stitches for, we will pick up one stitch for each stitch.

picking up stitches 1
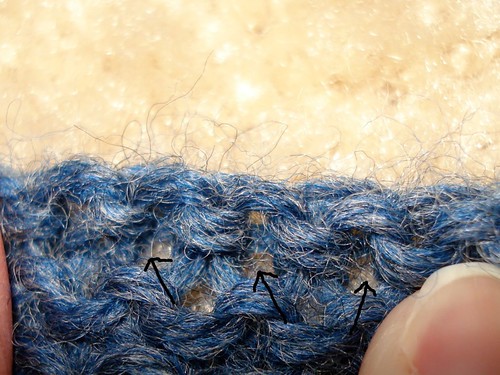
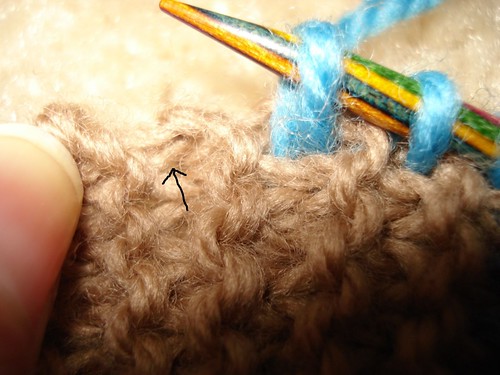
Above, you can see the black arrows pointing to where I'll pick up each stitch. Note that I'm not picking up stitches in the bind off row. I'm picking up stitches on the last row of knitting. This will give me a little seam on the back side, but it also means I'm getting enough of the original knitted section for my new section (whether Franket block or neckband/hood) to be attached firmly. If this were a sweater, you might wonder why you'd have to pick up stitches for a neck band (or hood) in the first place. Why not just short row the neck shaping and then work the band from that? Well, by binding off the neckline before doing the band, you've created an edge that is more stable and less elastic than live stitches are. This gives the neck the stability it needs to stay neck-shaped and not get stretched out of whack. Even if the directions don't say to bind off the neckline (this happens more on hoodies than on neckbands), I still like to bind off, just to add that extra stability to the neck area.

DSC03928
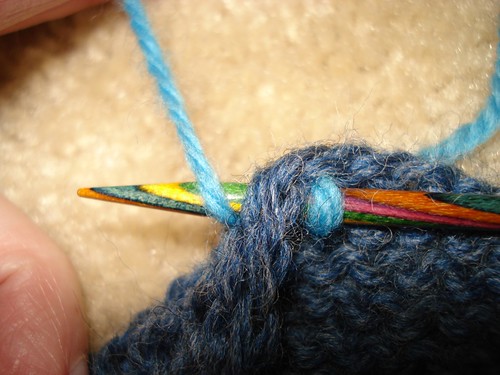
Using my needle and yarn (I've used a bright turquoise just to make things easier to see in the photos), with the right side of the knitting facing me, I work from right to left. I leave an 8 inch tail just dangling from the back side and weave it in later.

DSC03929
With the needle in my right hand, I poke it through the first stitch from front to back (poke it through where the arrows are in one of the previous pictures), wrap the yarn around the needle in the same direction you would make a yarn over, and pull the needle with the loop of yarn back to the front of the work. Then poke the needle through the next stitch from front to back and repeat. See? It's pretty easy!

picking up stitches 2
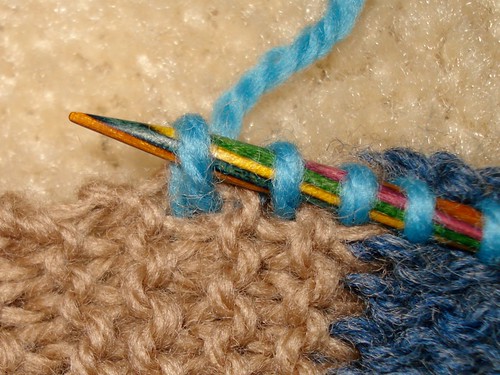
OK, so now I've picked up along an edge that was knitted in the same direction as I'll be going on my new section - that's pretty easy. How do you pick up an edge that was knitted perpendicular to your new section? This isn't really much harder once you figure out where to stick the needle. (The poking the needle through, wrapping the new yarn around the needle and pulling it back through is still the same, the only new thing to learn is where to poke the needle through.) The picture above shows where I like pick up on garter stitch. Since garter stitch gives you a ridge every two rows, picking up one stitch for each ridge is pretty easy to do. I like to poke my needle through just to the right of each ridge, between the last stitch of the row (the edge stitch) and the second to last stitch. This means I go under two bits of yarn when I poke the needle through.

DSC03933
Again, I'll have a little seam on the wrong side, but the new section is firmly attached to the previously knitted section. On a non garter stitch project, like front sweater bands, I don't have ridges to help me out, but I still poke the needle through between the edge stitch and the second to last stitch on the rows that get stitches picked up. (See above for the ratio I use.) I just have to count as I go - usually a 1, 2, 3, skip, 1, 2, 3, skip, and so on, until I've picked up what I need for the new section.

DSC03934
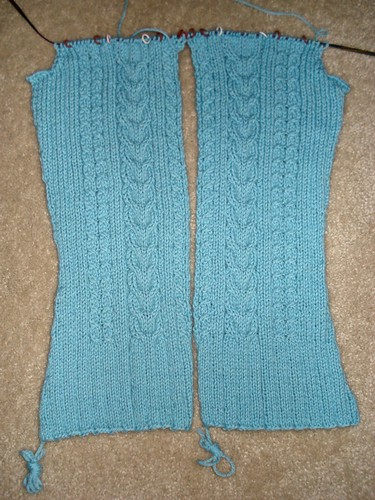
As you can see above, whether I'm picking up stitches parallel to the previous work or perpendicular to it, I get a nice, straight line with the new stitches for the next section to grow on. There is no jog where the two previous blocks join and everything is firmly attached to it's neighbor. Once I've picked up stitches, I can then work back on the wrong side beginning in whatever stitch pattern the band/new section requires.

I'd like to add an extra note about front bands for cardigans. Most patterns will tell you how many stitches to pick up for bands. There are a couple of reasons for this: people tend to freak out if you don't tell them exactly what to do in a pattern, and depending on the stitch pattern, you may need a certain number of stitches to get the repeat just right. The problem with this is that many times we get our stitch gauge correct and then don't necessarily get our row gauge correct with the pattern. Most patterns tell us to "continue until piece measures X inches from cast on/beginning of armhole shaping/last decrease" and they don't really concern themselves with row gauge until you get to the bands. If your row gauge is off and you pick up the exact number of stitches that the pattern tells you to, your front bands aren't going to fit. Here's what I do and it's always worked perfectly. First, look at the sweater's gauge - if it's more than 4 stitches per inch, I'll pick up 3 stitches for every 4; 4 stitches or less per inch, I'll pick up 2 for every 3. Before I start picking up stitches, I'll check the stitch repeat for the bands. For instance 2x2 rib (K2, P2) is a 4 stitch repeat + 2 - if I begin with a K2, I want to end with a K2 so things look nice. Seed Stitch is a 2 stitch repeat + 1. Knowing this, I can adjust stitch numbers as I pick up. Then I start picking up stitches - I always pick up the first stitch and I always pick up the last stitch - even if it means I pick up an extra stitch beyond my ideal ratio. If you've ever had bands that didn't quite reach the bottom of your cardi, this is where you went wrong. While I'm picking up stitches, I'm counting them as well. If it looks like I'm going to come up one or two stitches short, I'll frog my picked up stitches a little bit and pick up an extra stitch or two somewhere in the middle (not too close to each other though). If it looks like I'll have an extra stitch or two, instead of skipping one (and chancing bands that are too tight), I'll work a K stitch on the first row as a K2tog (evenly space them somewhere in the middle of the band if you have more than one to decrease). It will get lost being right next to the pick up row and no one will ever see it.

I hope this helps anyone who's had trouble picking up stitches in the past (or even finding directions for picking up stitches). It's not difficult to pick up stitches once you figure out where to pick them and hopefully this cleared up some of those questions.

Friday, March 05, 2010

The Stripy Bag Gets - Stripes!

DSC03920
I've finished the bottom of the Stripy Bag (there's links to the original pattern as well as my mods in Tuesday's post) and I'm now adding stripes as I work up the sides of the bag! I decided to work two rounds of each color since this is a sportweight yarn I'm using. I believe Lucy used Rowan Handknit Cotton which is more of a DK or worsted weight. Each round is adding just under 1/2 inch to the height of my bag, so two rows of each color should give me enough of a stripe to see the colors well. Want to know what color comes next? You'll find out next week!

There were a couple of comments this week from people who liked the bag, but didn't know how to crochet and I'd just like to encourage those of you out there who are in this position to go ahead and make a bag anyway. All you'll need is either a basic crochet book (I have this one and this one for basic information) or look up double crochet on You Tube (that's treble crochet for UK crocheters). When I first started the Star Flowers scarf I sat there with the book open and did each little double crochet stitch, following the directions. After two or three stars, I didn't need the book anymore. This bag is even easier. There's no shame in sitting there following directions for every stitch (or watching a video) and I bet by the time you're through the first round, you won't even need to check directions anymore. Once you know how to double crochet, you just keep going. Want to know a secret? All I can do without checking the books is double crochet, chain stitch, and slip stitch. Anything else and I'll have to pull out my books and find out how to do it. See? You can crochet a bag without really knowing how to crochet! And for a little bit more enabling, the Babette is made of those same techniques - double crochet, chain stitch, and slip stitch.

Have a great weekend!

Labels:

Wednesday, March 03, 2010

Who Disturbs My Slumber?

DSC03918
Oh, excuse me Mr. Ramius, sir. It's just me, a lone block from The Babette.

Where did you come from?

Your Mommy, the Pink Lemon made me. She started me before the Ravelympics began and finished me in bits and spurts during the Ravelympics.

You have strings hanging off of you.

Yes Mr. Ramius, sir. She hasn't had time to weave in my ends and trim them off yet.

You look a little big to be a Babette block, are you sure that's what you are?

I am one of the biggest of The Babette blocks. There aren't very many of us like there are of the smaller sizes.

Oh, OK, then go away so I can nap now. It's time for my "After-Caleb-Goes-To-School-Nap," the one that comes before my "Mid-Morning-Nap." It's crucial that I get both naps in order to be well rested for my "Lunchtime-Nap."

Sorry to bother you Mr. Ramius, sir. Sleep well.

Labels: , ,

Tuesday, March 02, 2010

Something New!

Now that the Ravelympics are over, I'll give you all a break from The Franket for a few days. I know looking at Garter Stitch rectangle after Garter Stitch rectangle had to get old pretty quickly. I decided to start something new because I had some cotton yarn in my stash and while I know that a lot of people like to crochet in cotton, I didn't know how I'd feel about it since I'm not a huge fan of knitting with it. I had seen this little bag, designed by Lucy of Attic 24 and thought it would be fun to make with the cotton and it should be a smallish project so I could get it done quickly. Although Lucy's original bag had a multicolored bottom, I had more of this color of yarn than the other colors I'll be using, so I decided to make a solid colored bottom. (The yarn is Omega Sinfonia, it's a cabled, mercerized cotton that I picked up at Hobby Lobby.)

DSC03911
In the original pattern, the bottom of the bag is round, making the entire bag round. It's cute, but one of my pet peeves is bag handles that fall off my shoulder while I'm carrying it. I've found that bags that stay closer to my body are less likely to fall off and irritate me, so I decided to make the bottom of my bag an oval. Fortunately, Beyond The Square has an oval in it (Motif 125) so I started with that. The pattern only gives you the first 5 rounds, but it explains how to keep going. As you can see in the picture above, I was working on my eighth round and I started to notice something. The oval was becoming pretty fat. I was keeping my increases at the ends of the oval, but because I was adding the same amount to the ends as I was to the sides on each round, the proportions weren't staying as long and oval as I wanted them to - the shape was getting rounder.

DSC03915
I realized that what the bottom of the bag needed was more length added to it and since I don't know how to short row in crochet, the only thing I could come up with was to frog the whole thing and start with a longer chain - 4 times longer to be exact! (Frogging crochet is even more fun than frogging knitting - it makes the same fun "pop pop" sound, but it deconstructs in weird ways - not just rows!) So I restarted my bag bottom and quickly realized that by doing this, I'd have to figure out how to do each round on my own. I knew I needed to increase 6 stitches at each end of the oval on each round and once I learned to count to 6 (yes, it took some practice), I was off and running! On round two I realized that I had really gotten quite cocky with this whole crochet thing, seeing as all I can do without looking it up in the book is chain stitch, slip stitch and double crochet. Fortunately, that's all this bag bottom requires though. As you can see, I'm in the middle of round 3. I've got markers on the center stitches and I'm using markers to tell myself where to work increases, but so far I think it's working pretty well! Sometimes when you don't know what you're doing it works out just fine.

Labels:

Monday, March 01, 2010

The Franket and a Historical Hero

DSC03908
Yesterday afternoon I finished the Big Blue Block! I have one more block to add to the Franket before it's finished, but it's going to be the biggest block of all.

Right now it measures 51 inches tall by 63 inches wide. (Just out of curiousity, I checked the pattern and they claim it's supposed to be 50 x 60 when it's finished. No, I didn't check gauge, why do you ask?) The last block is supposed to go at the bottom of what you see in the picture and is supposed to be worked half in the sand color and half in the darkest chocolate color (intarsia). I asked Mickael about it, and we looked at the blanket together and decided to make some changes. If I do the final block as the pattern is written, the blanket will be about 72 inches by 63 inches - huge, but really wider than it needs to be. If I attach the last block next to the Big Blue Block, it will be 51 inches wide and nice and long - a much better fit for a tall husband (I say 6'3", he claims 6'2" but whichever, he's tall). So that's what I'm going to do. I'll put the last block on in two colors, doing intarsia, next to the Big Blue Block and finish the blanket.

Since it's not done, I don't get a medal in the Ravelympics, but I'm OK with that. I've made most of a giant monster blanket.

DSC03906
In a completely different topic, just for a little bit of Monday fun, have you ever wondered what Davy Crockett would look like if he was a potato? Check out that hand knitted hat he's sporting. (Plans A and B, both involving pipe cleaners, fell through so I knit the little potato a hat. I've never knit for a potato before.) We had checked ahead of time that our potato could be armed at school. You can't very well be king of the wild frontier and wander around unarmed. You never know where a bear might pop up!

Labels: