<body><script type="text/javascript"> function setAttributeOnload(object, attribute, val) { if(window.addEventListener) { window.addEventListener('load', function(){ object[attribute] = val; }, false); } else { window.attachEvent('onload', function(){ object[attribute] = val; }); } } </script> <div id="navbar-iframe-container"></div> <script type="text/javascript" src="https://apis.google.com/js/platform.js"></script> <script type="text/javascript"> gapi.load("gapi.iframes:gapi.iframes.style.bubble", function() { if (gapi.iframes && gapi.iframes.getContext) { gapi.iframes.getContext().openChild({ url: 'https://www.blogger.com/navbar/10582443?origin\x3dhttp://pinklemontwist.blogspot.com', where: document.getElementById("navbar-iframe-container"), id: "navbar-iframe" }); } }); </script>

Tuesday, June 23, 2026

Hexagon Update

Hexagons

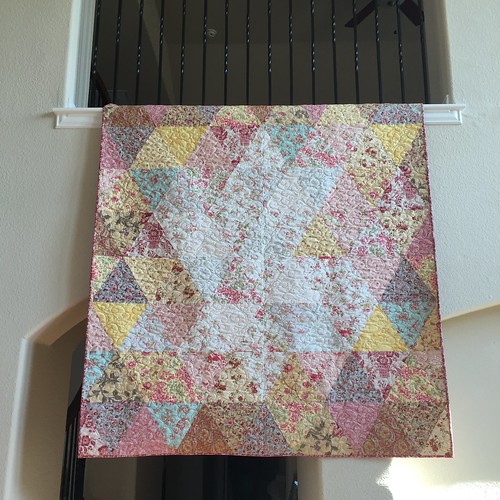
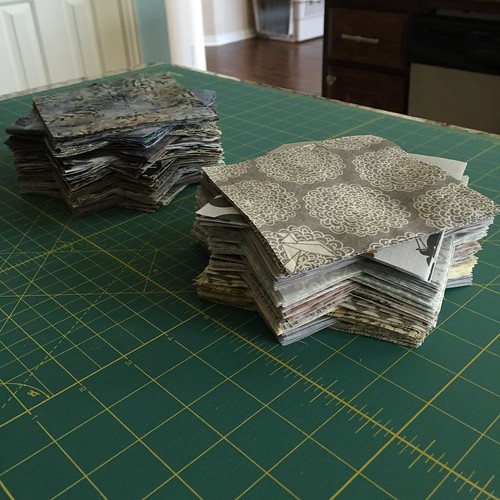
I am moving right along with my hexagons for my scrappy English Paper Pieced quilt.  I have 450 basted hexagons now!  I don't know for sure how many I will need for a lap quilt, but I'm guessing 1500-2000.  I don't think that's going to be an issue.  This began as a way to use up quilting scraps and I was inspired by the Buttonbox Throw blanket that I finished at the first of the year.  I had so much fun using up leftover sock yarn scraps, I decided to start another scrap sock yarn blanket (the Virus blanket), and decided to start this English Paper Piecing quilt to put a dent in my quilting fabric scraps.

Hexagons

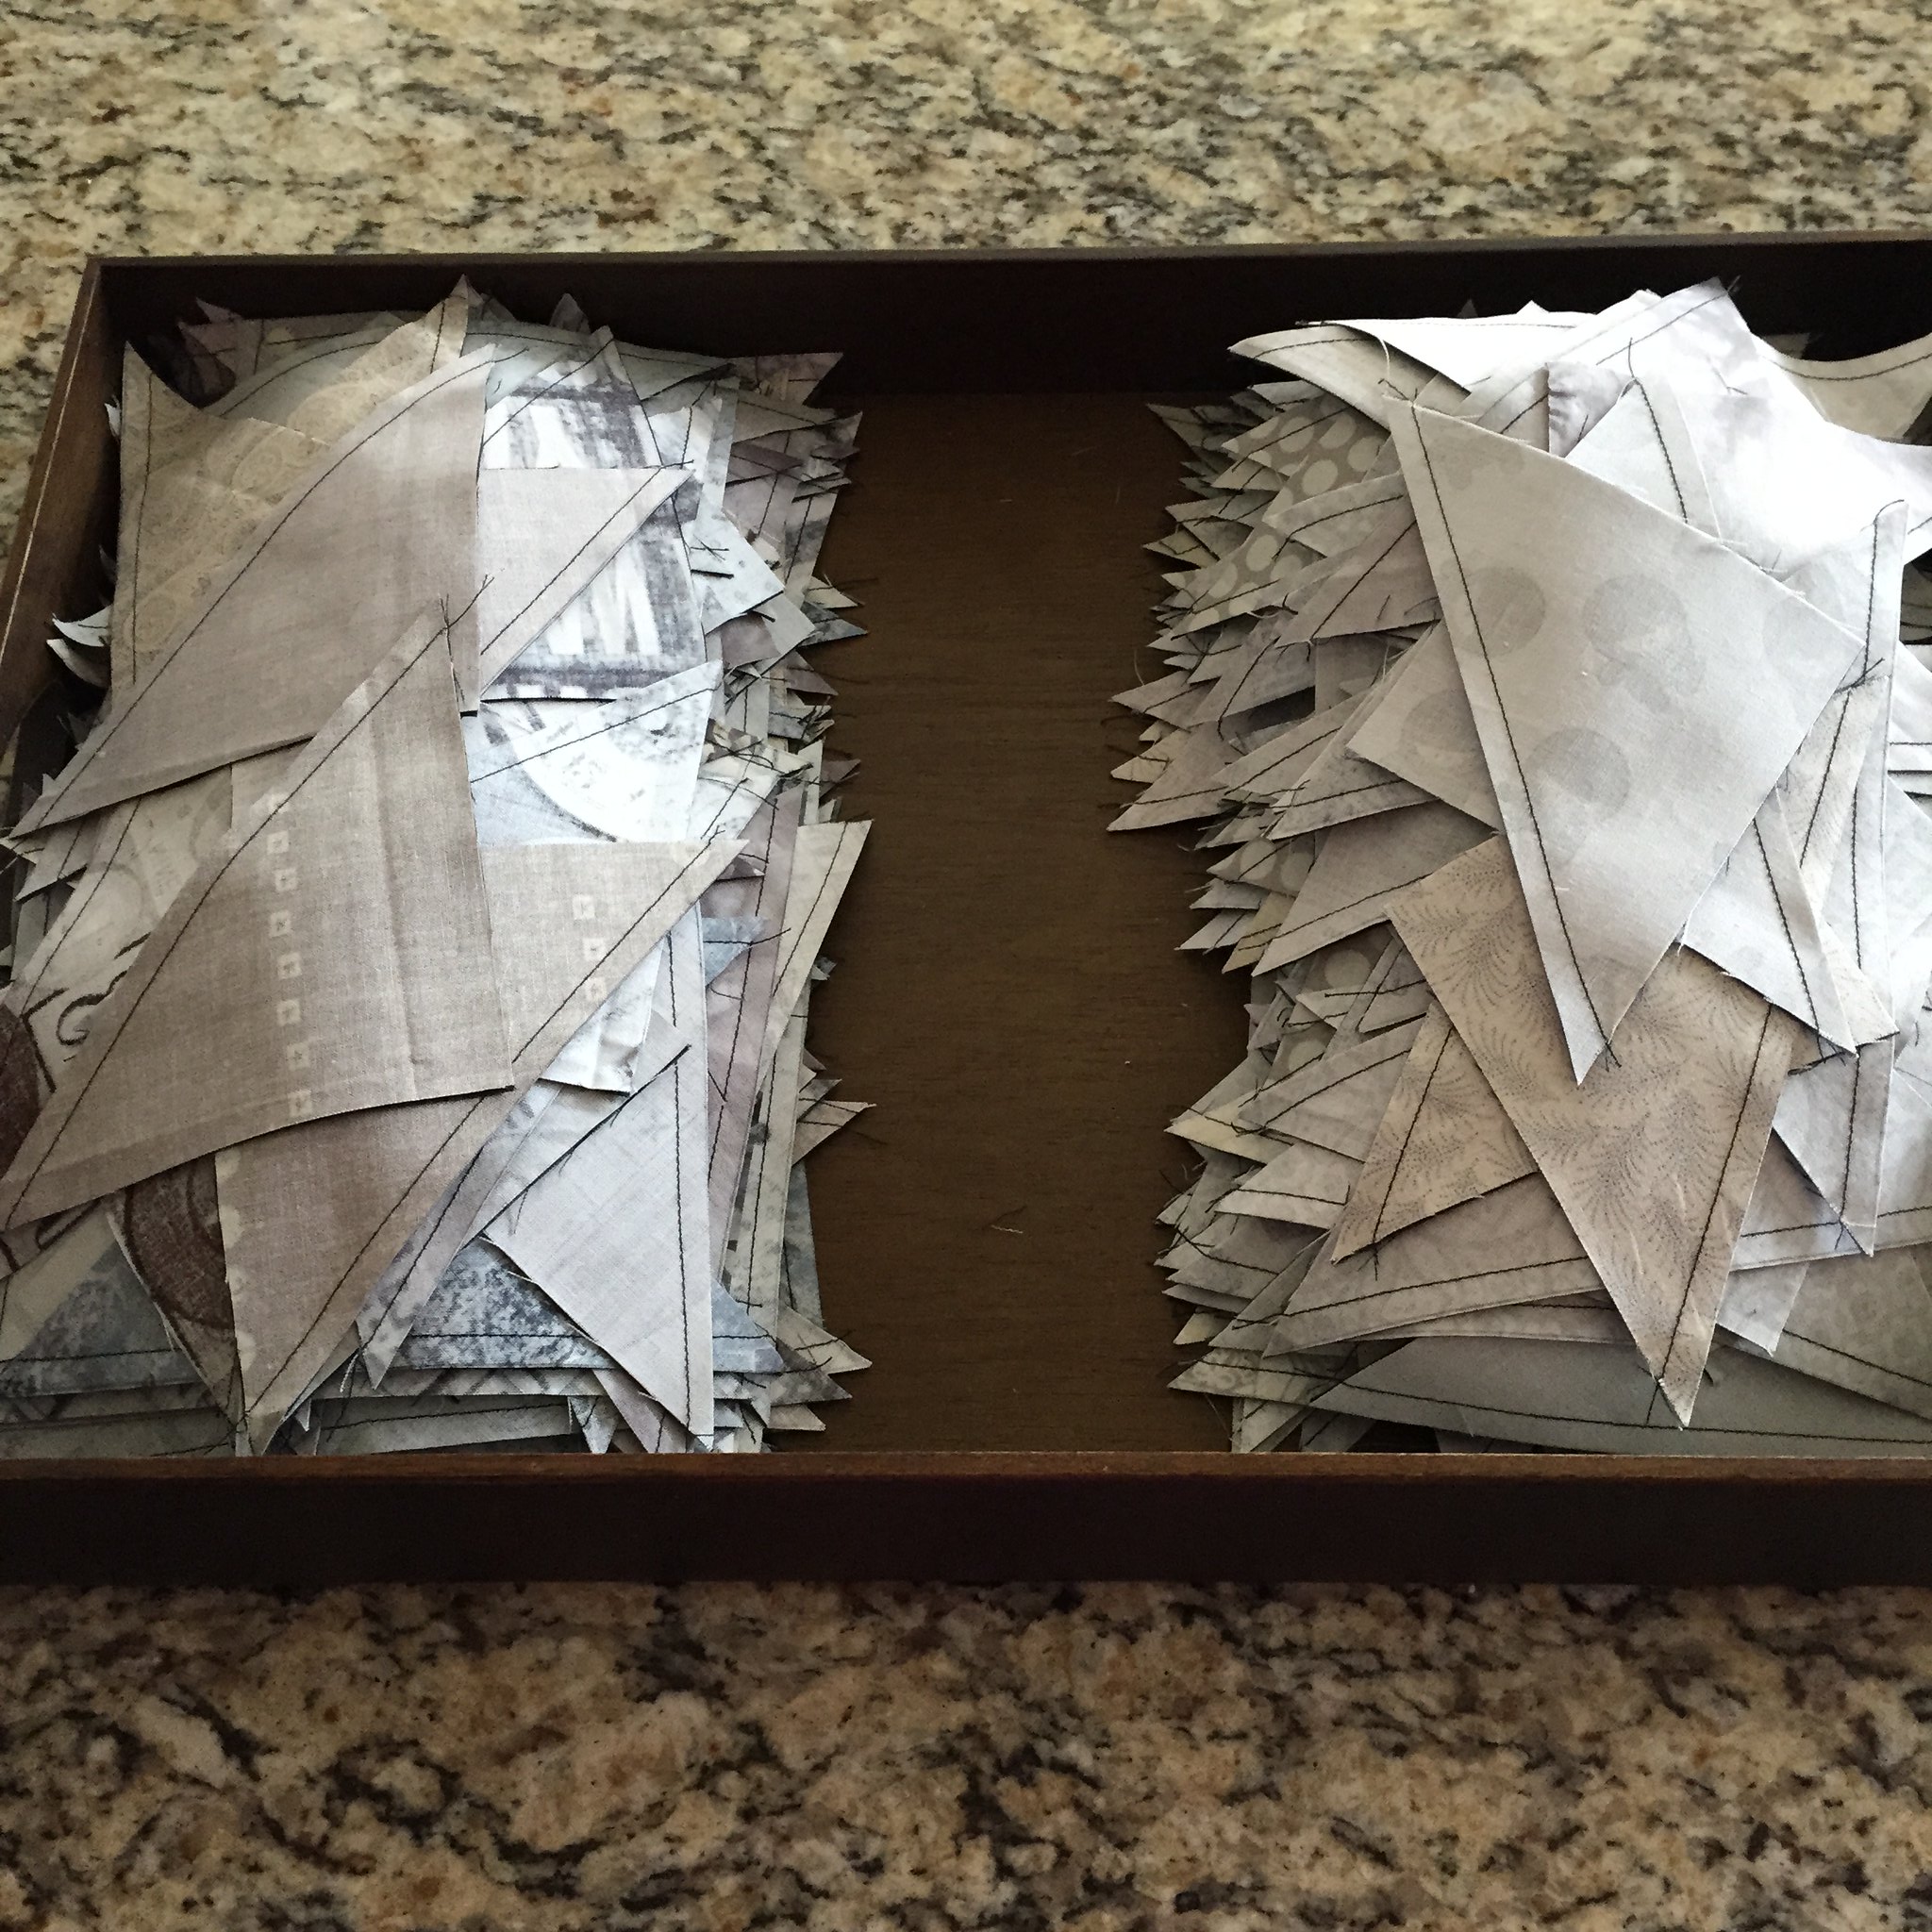
Initially my plan was to get some hexagons basted (they're basted around die cut, cardstock hexagons so they're all the same size), and then sew them together, and then baste some more, and so on.  I realized that that would mean the different fabrics wouldn't be scattered around the quilt if I did it that way.  So the current plan is to keep basting until I run out of scraps (I have a tote filled with them and I'm just cutting them in batches as I go).  Once they're all basted, I'll toss them into a bag or something and mix them all up before I start sewing them together.  I'm stacking them in a plastic organizer box in rows of 150 in the meantime.  I'm not fussy cutting any of the scraps, but I did end up with a bear on one of them! 

Labels: ,

Thursday, April 23, 2026

Using More Scraps!

Clearly, I'm on a Using Scraps kick.  I don't know how long this will last, but I'm going to go with it while I can.  So I've made one blanket from yarn scraps, and started another one, but my scraps aren't just yarn.  I don't blog about it much because I haven't been doing very much lately, but in addition to knitting, crochet, spinning, and sewing, I also quilt.  Quilting uses small pieces of fabric, but it also makes them.  Lots of them.  Of course, I look at them and know they're usable pieces of fabric, and sometimes I use them in small bags or as fly facings or pocket linings, but most of them sit there and stare at me. 

Hexagons!

When I started using up yarn scraps, the fabric scraps started whining about how they were being neglected and why didn't I use them up too?  So I am.  I'm making a hexagon quilt with my fabric scraps.  A piece of fabric 2-1/2" x 2-1/4" will do one, 1 inch hexagon.  (The die cut, cardstock hexagons are sized by the measurement of one side.)  I baste the fabric around the hexagon (not through it, that wears them out faster), and then I will sew them together.  

Hexagons!

I've got a little case (it's a Hot Wheels car case from Amazon) where I keep all my supplies, and I put the finished hexagons in the other side.  I can store 150 easily in this case, and then I've got a bigger box to keep them in so I can keep on working.  

Hexagons!

I don't know how big this will be when I'm finished, and I probably won't get all my hexagons basted before I start sewing them together, but I'll just work on it here and there.  Right now I'm in a basting mood, but at some point I'll start sewing them together.

If anyone is interested in more details, search English Paper Piecing, Hexagons and that should keep you busy for a while.  If you have specific questions, ask in the comments and I'll add more information!  Gotta run!  Have a great weekend! 

Labels: ,

Tuesday, September 27, 2022

Magic Stars

Small log cabin quilt

You might remember back in August I sent two quilt tops to be quilted - one king size and one throw size.  I got them back, all quilted, late last week!  I immediately sat down and got them trimmed up and sewed the binding on both quilts, then I started turning it to the back and finishing it by hand.  I'm still working on the king size one, but I finished the throw size quilt!

Small log cabin quilt

I asked for 100% cotton batting for both quilts because I like the way it breathes, I like the way it feels, and I like what it does when you wash it.  Above, you can see a photo of the center of the quilt as it was when I got it back.  The quilting is visible, but it's still pretty smooth.  You can't feel it in the photo, but it was kind of stiff and didn't have very much drape.

Small log cabin quilt

After washing, the quilting has much more depth, the stars in the pattern are much more visible, and the quilt has amazing softness and drape.  This is because when you wash it the first time, the batting shrinks a tiny bit.  All of my fabrics were prewashed before I started piecing the top, and before I prepared the backings.  They had already done their shrinking, but when the batting shrinks, it pulls the fabrics along with it.  You get much more depth in the quilting and the whole hand of the quilt changes into something that wraps around you when pull it over you.

In this quilt, the stars being more visible was a happy surprise.  I had asked Sheryl (from Hedgehog Quilting) to use the Midnight Sparkle pattern to quilt both of these.  She had it but had never used it.  The stars are actually stitched twice, so they have a double layer of thread and stand out a bit from the swirling background.  Once the quilt was washed, they popped a little bit more.  I don't think they distract from the quilting or the different fabrics, they're just another layer on top of all the rest and I just love the way they add to the finished look!

I'm about halfway around the hand stitching on the king size quilt and hope to get it finished this week!

Labels:

Thursday, August 18, 2022

One More Blanket

Flannel quilt for Caleb

Earlier this Summer, when I decided to make Caleb a crocheted throw, I decided to make him a throw sized quilt as well.  I planned a super simple design and I thought flannel would be perfect for it.  I used the Mammoth Flannels from Robert Kaufman for his quilt because they come in a huge range of plaids and solids, and they're really thick, substantial flannels.  (This is the same flannel line that I chose to back the king size log cabin quilt I showed you a couple of weeks ago.)

Flannel quilt for Caleb

As far as the quilt design goes, I didn't make quilt blocks, but just used the width of fabric (once I had removed the selvedges) to figure out how long I wanted the center section.  Then I added the striped mitered borders.  I used maroon and cream (I feel like you might have seen this color combination before?) for the inner borders and then added a wide border of the gray and the finished quilt top reminds me of vintage football and rugby uniforms.

Flannel quilt for Caleb

At this point I sent the quilt and backing (more flannel, a black and gray plaid this time) to the longarm quilter to be quilted.  I asked her for a watery looking quilting design as a nod to his Oceanography major, and we ended up picking one called Undertow.  It reminds me of whirlpools as well as raindrops on a lake or ocean.  When I sent it to her, I wasn't sure if I would get it back before he left for school, but it arrived Tuesday morning.  I had already made the binding, so after trimming up the quilt I was able to get the binding sewn onto the front side before lunchtime.  By bedtime Tuesday night I had hand stitched the binding over the edge, on the back side and it was finished!  I got these photos and yesterday he walked around with the quilt draped over his head and wrapped around himself most of the day.  He has declared that it is just the right amount of cozy.

The finished quilt is bigger than the crocheted throw, but I figure the crocheted throw will be useful at his desk chair since it should be small enough not to get caught in the wheels while the quilt can be used on his bed for naps, or either one could be used on the sofa.  However he decides to use them, he'll have enough to make a nice blanket fort too!

Have a great weekend!  I've got to get everything gathered up and packed so we can haul it down to College Station in a few days.  I've got sticky note lists all over the house right now!

Labels:

Thursday, August 04, 2022

More Quilting

Quilts

Last time I showed you this quilt I was ready to put borders on it.  I sat down with the fabrics leftover from piecing the blocks and started playing.  After trying several different things and nothing being quite right I finally realized that this quilt wanted light colored borders.  Once I realized that it was easy!  

Quilts

I decided to do a narrow border of the dark red I used in the center of the log cabin blocks and then do a second, wide border.  I didn't have enough of a single fabric to use for all four sides, so I decided to use two different fabrics and a third for corner squares.  The quilt top uses so many different fabrics in each block -seventeen to be exact- that I thought this approach would work, and I'm very happy with it!  (Also, this photo was taken before it had its final pressing, sorry about the wrinkles.)

Quilts

I can't remember if I mentioned the small throw the other day, but when I made the blocks for the king size quilt I made a few extras.  I ended up having enough for a throw size quilt, so that needed borders too.  That one did get dark borders, and since I set the log cabin blocks on point (diagonally instead of square for you non-quilters out there), I did mitered corners.

Finally, I had to decide on backings.  The last time we talked about this the question was "To Flannel or Not To Flannel?"

Quilt backings

I decided the answer was both!  The plaid you see in the background is the backing for the king size bed quilt.  It's Robert Kaufman Mammoth Flannel (which are really wonderful flannels if you've never used them).  The folded gray floral is the backing for the throw quilt and it's just regular quilting cotton.

I was able to get both tops and backings finished yesterday and they are somewhere between north Texas and Colorado now!  Have a good weekend!

Labels:

Thursday, July 28, 2022

Quilting

Log cabin quilt

As you know from my rambling on this blog, I've been doing some more sewing lately.  That has also meant going through some unfinished projects, and I recently pulled this quilt top out to finish it.  

Log cabin quilt

I began this log cabin quilt in the late 1990's when I was working at a quilt shop.  I finished sewing the blocks together in this house, so sometime after 2009.  I think it's more than time for borders, don't you? Also, just as a side note, for some reason one of the blues is photographing a lot lighter and brighter than it is in real life.  It's not quite as dark as the other blue, but it's not the electric blue it's trying to be in these photos either.

Log cabin quilt

I have plenty of fabric for the borders, I just had to figure out what I wanted to do, but first I needed some measurements.  I had help holding the quilt down for that.  I'm hoping to get the borders added today, then I'll need to figure out a backing (to flannel or not to flannel, that is the question) and I really hope to get this mailed off to the longarm quilter before Caleb goes back to school later this month.  (It's not for Caleb, it's a Fall/Winter quilt for Mickael and I, and also Noodle obviously.  I'm just using Caleb's schedule as a time goal.) That way I'll have it back and ready to bind before the weather turns cold.  (Ha ha!  I'm laughing too!)  

Have a great weekend!

Labels: ,

Friday, May 13, 2016

Finished!

Loopy Academy 
I have finished my table runner for Loopy Academy!  This is my last official project for Loopy Academy, both sewing and knitting editions.  I'm still knitting on my extra credit, but that should be finished soon.
Loopy Academy quilted runner.  Sewing year 1, semester 2.
I used Anna Maria Horner's Featherbed pattern to make the runner, and honestly, I'd really like to make an actual quilt with this pattern, maybe using batiks for the feathers.  It's a fun block to piece (although technically, each 18 inch finished block uses two feathers), but it must be sewn carefully as there are places where you join bias to bias (assuming you cut the pieces to keep the outside of the block on the straight grain).
Loopy Academy quilted runner.  Sewing year 1, semester 2.
I pieced the backing with the leftover strips from the feathers and a couple of fat quarters that I didn't use in the feathers (one was too light and the other was too close to a blue I did use).  It was quilted in a simple two inch grid and bound in the same fabric I used for the background.
image
Here's an action shot of the runner being used by Max.  He's not supposed to be up here, but he's never been too concerned with our human rules around here.

Have a great weekend!

Labels: , ,

Wednesday, May 11, 2016

Look What I Did!

Loopy Academy quilted table runner 
I finally got my backing pieced for my table runner, layered the whole thing and got it quilted!  I've been dithering about how I wanted to quilt it (dithering is a great word, isn't it?), so I wasn't really feeling like I HAD to get the backing done until I decided what to do.  Normally, I'm a fan of very heavy, dense quilting.  For this project however, the feathers are so big and bold, and the solid fabrics emphasize that, I felt that heavy, dense quilting might be too much.  I found a dark chocolate colored thread in my stash that matches the feathers' shafts and decided to quilt a simple grid on top.  I considered a diagonal grid, but there isn't a single 45 degree angle on this quilt, and I was afraid it might look really weird.
Loopy Academy quilted table runner
Once I made up my mind, everything went together really quickly.  As you can see, I used the scraps from the feather piecing in the center of the back, along with a couple of extra fat quarters that didn't make it into the top.  Now I'll just trim the edges and bind it and this project is finished!

Labels: , ,

Monday, December 28, 2015

I'm Back!

I am back to blogging normally now!  I've finished my Christmas knitting (all on time), and last night I even finished my last project for Loopy Academy Sewing!  I'll catch you guys up this week!
image
This is my Seasonal Wallhanging project for Loopy Academy.  The design is a quilt block from Kumiko Sudo's Fabled Flowers book - this is the hydrangea.  I started by appliqueing the leaves and stem onto the background by hand. Next I added the borders and quilted and bound it.  Finally, I started folding blossoms (each one starts as a much larger square of fabric).  Then I sat down and started sewing them onto the quilt. 

I waited until the end to sew on the blossoms because I wanted to quilt behind the flowers beforehand and I also wanted them supported by all three layers of the quilt.  This meant that there are little knots all over the back side of the quilt, but I used a crazy, bright pink batik for the backing and since it's a wall hanging, the knots are against the wall anyway.

Once I finished this project, I only had the placemats to make for my first semester of Loopy Academy.  I'll show you those tomorrow.  I'm hoping that it's not so dark around here and I can get photos today.

Next semester I'm going to manage my time better and not wait until the last minute to finish Loopy Academy.  I did have the sense to start with the most involved project and work towards the easiest, but if there had been any extra credit like there was last spring with Knitting Loopy Academy, I might not have finished.

Labels: , ,

Wednesday, November 11, 2015

Binding

Do you remember that black and gray chevron quilt I made?  Well, it’s all quilted and it’s supposed to be here later today!  Yesterday I cut binding.  I’ve still got to sew it together and I didn’t bother taking any pictures of the binding strips because, well, they’re black.  Not very exciting at all.

Also, I forgot to mention that I’ve started Christmas knitting and it’s not bloggable.  This means that I won’t be blogging quite as regularly as I usually try to until I’ve finished the Christmas knitting.  On the other hand, I still have to finish knitting my mitts for Loopy Academy, and I haven’t really done much of anything for Loopy Academy’s sewing version, so there are definitely some bloggable things in the works.  I’ll pop in when I can, and Logan and Max have volunteered to occasionally help out here on the blog, but I didn’t want anyone worrying that my gall bladder had grown back or something (may it burn in a fiery medical bio-waste inferno for all eternity).

Labels: ,

Thursday, October 22, 2015

Borders

image 
Last night I added borders to the black and gray chevron quilt.  I used mitered corners, although you can’t really tell in the black borders when I take photographs at night.  Trust me, they’re mitered.

I’m sewing the backing together today, and then this will be ready to send off for quilting!

Once this is sent off, I’m going to get started on Loopy Academy Sewing.  I’ve been waiting to finish this quilt first, but I’m looking forward to working on some smaller projects.

Labels: ,

Friday, October 16, 2015

Almost a Quilt Top!

image
I know this photo looks a lot like last Friday’s photo, but if you look closely, you can see that this week, the blocks are sewn together!  I’ve still got to add borders before the top is finished.  Then I have to sew the backing together and it’s off to be quilted!

I’ve had the blocks spread out on the sewing room floor for a week now which means I had to put the child gate up to keep Logan out of the room.  Logan is NOT a good quilting dog.  He moves blocks around, rolls on them, and does Snowplow Nose through the middle of them.  Considering that he’s really a good dog with everything else, I can deal with his quilting issues.  Anyway, since the sewing room is temporarily a Logan free zone, Max has been coming in to play more (he usually gets snarfled by Logan in there and doesn’t have space to explore).  I think Max knows this is a quilt because I caught him trying to climb underneath it for a nap.  He’s also plopped down in the middle of it to keep it from wandering off.

I’m hoping to send this off to Hedgehog Quilting by the end of next week, so I guess I better get out the super long tape measure so I know how long to make the borders!  Have a great weekend!

Labels: ,

Friday, October 09, 2015

Ready to Sew Together

image 
Do you remember all those half square triangles I made?  Well, I’ve made all the blocks from them!  I laid them out yesterday and while I have a few blocks I want to swap around, I’ll be sewing them together this weekend.

When I cut my fabrics I sorted the grays into a light pile and a dark pile.  It wasn’t very scientific, I just went with my gut.  In fact the darkest grays in the light pile could have easily gone into the dark pile, and the lightest grays of the dark pile could have been lights.  When I went to sew the blocks together, I used the light grays on the left half of the block and the dark grays on the right half.  As you can see with all the blocks laid out together, it gives kind of a three dimensional look to my chevrons.  I wasn’t exactly sure if it would work out until I started laying out blocks into rows, but I’m really happy that it did!

I hope you all have a great weekend!  I’ve got some sewing to do!

Labels: ,

Wednesday, September 30, 2015

Piecing

image
Do you remember all those half square triangles I made?  Well, I’ve been sewing them together and now I’m joining them into blocks!  I’ve got about 25 blocks sewn now and I have to have 110 for my project, but I’m getting there!  Once I get them all sewn and pressed (this is currently the only block pressed), I’ll arrange them on the floor before sewing them into rows and finishing the quilt top.  Before I do that however, I’ll have to vacuum my sewing room floor.  A certain very light Golden Retriever likes to laze about and roll and wiggle in the middle of the sewing room floor.  Charcoal and gray quilt tops don’t really go very well with Logan’s creamy hair.

Labels:

Wednesday, September 16, 2015

Triangles

image
220 gray squares were paired with 220 charcoal squares.  A line was drawn down the center and a seam was sewn on either side of the line, 1/4 inch away.
image
Then they were cut apart.  Now I have 440 half square triangles.
image
Next I will cut off all the little dog ears and press them open, pressing the seam allowances towards the charcoal side.

That’s a lot of half square triangles!

Labels: ,

Monday, August 17, 2015

Camp Loopy 2015, Project 3, Finished!

image 
I’ve finished my quilt!  Saturday morning I sat down and finished sewing the binding down on the back side.  As soon as I’d finished, I started getting pictures for Camp Loopy.  Once I get everything uploaded into The Loopy Ewe, I’ll be finished with Camp Loopy for this year!  This was the first year I’ve done the sewing version of Camp Loopy and it was very different from the knitting version.  Sewing is overall faster than knitting, but I found myself being pushed creatively more with sewing camp than I am with knitting camp.  With knitting camp, the primary challenge is to just keep knitting so you don’t fall behind!  I definitely enjoyed it, and unlike knitting camp, I was able to sew on non-camp things as well this summer. (Wiksten tank, anyone?)

Anyway, back to the quilt!  The challenge was to use colors or fabrics you don’t usually use.  I almost never use yellow and I have never used this many floral fabrics in one project.  There was a decent chance that my quilt would look like a flower shop threw up on it, but I love the finished project.  I used a darker red floral for the binding because there are no borders on this quilt, and I felt like a darker color would act a bit like a frame.  The backing is a large scale floral.  Here’s the label and a peek at the backing:
image
Here’s what the quilt looks like from the back:
image
A detail of the binding at the front edge of the quilt.
image
Once I got these pictures, I put the quilt down and Max saw it for the first time.  (He slept through construction and didn’t get a chance to do quality control.)  After sniffing it, he plopped down right in the middle of it and took a bath.  A very thorough bath.  He’s taken several naps under it when it’s spread out, but when I fold it up, he curls up on top of it too.  I think he’s claimed it as his own! The photo below may be the last time the quilt and kitten were apart. 
image

Labels: , ,

Friday, August 14, 2015

Camp Loopy 2015, Project Three

image 
I got my quilt back yesterday!  After making the top and seaming the backing, I sent it off to Hedgehog Quilting in Colorado to be quilted by Sheryl.  Since Sheryl is a Loopy Groupie (and I think is actually a Loopy Elf as well), I didn’t have to explain Camp Loopy to her.  She already knew and understood the time frame we were working with.

I originally contacted her back in July about the possibility of quilting my camp project and we discussed timing to allow her time to quilt it as well as shipping time, while getting it back to me in time to bind and finish it.  We agreed that if I had it to her by mid August, she could get it quilted and shipped back to me ASAP so I could finish it.  Fortunately, I was able to get the top pieced faster than expected so we had plenty of time.  She still got it quilted and back in the mail super fast, though.
image
I chose an allover pattern for the quilting because I felt like all the florals in the fabrics would overwhelm anything else.  I told Sheryl I liked a swirl pattern she’d used on another quilt, so she emailed me several designs with swirls and/or florals.  The one I chose was a different swirl design from the original one I’d seen, but this one seemed more botanical.  It kind of reminds me of vines or fiddlehead ferns.  It really only shows up on the more tonal triangles, but I like the way it kind of fades in and out on the quilt.

In the photos, I have trimmed off the extra batting backing left from the quilting, but I haven’t put on the binding yet.  As soon as I took those photos, I took the quilt upstairs to my sewing machine and sewed the binding to the front of the quilt.  I’ll start hand sewing it to the back later today!  Hopefully Monday I’ll have a finished quilt to show you!

Have a great weekend!

Labels: , ,

Wednesday, August 12, 2015

A New Quilt

image 
Yesterday I did some cutting.  This is about 300 squares in various shades of gray.  They’re sorted into a light gray pile and a dark gray pile.  I’m starting a new quilt and these squares will eventually be half square triangles, but I have to cut more squares of the background fabric and do some sewing before I cut them into triangles.  I have a lot more squares to cut!

Labels: ,

Tuesday, February 09, 2010

Not Wooly, or Even Having to do with Yarn at All

DSC03865
Over the weekend, I sat down to work on the quilt top that I drug out of my stash closet a few weeks ago. I had originally planned on having 8 rows of 10 blocks each, but that was before we got The Big Mattress. Luckily, I had 9 extra blocks left over so I sat down at the sewing machine and made another block so I could add another row to the bottom of the quilt.

Then it was time to sew the rows (the original 8 were already together in rows) together. Big, long strips of blocks were joined, ironed and made bigger, long strips, then these were joined and after not too long of a time (but a bobbin and a half of thread - sewing together a quilt top eats some serious thread), I had all the blocks together! A final ironing and I was ready to see how much I need to add in borders. (Must cover The Big Mattress after all.)

DSC03868
Monday is Clean Sheet Day around here, so while the bed was stripped I carried the top in and spread it on The Big Mattress to get some measurements. I love the way it looks already, but there must be borders! Ramius even came to help, or at least walk around on the quilt top the way cats like to do. The next step will be to check what kind of yardage I have left from the blocks and figure out my borders.

DSC03869
I realized as I was typing this that I hadn't mentioned any real details about the quilt top, and since this really isn't "officially" a quilt blog (although I guess the "...and my crazy life." header leaves my options pretty wide open), there might be some of you out there that don't know anything about quilts. This is a Log Cabin quilt (you can see a single block at the top of this blog post), which is one of my favorite designs for a couple of reasons. The Log Cabin was the first quilt I ever made, when I took a class in Waco, Texas (the shop is no longer in business) after Mickael and I were married. Also, the Log Cabin block, while using lots of fabrics, has a light side and a dark side if you divide it diagonally. This gives you lots of different ways to arrange the blocks, by simply turning them different directions. The layout I used has a star in the center and then radiates out from that in what's called the Barn Raising layout. My Log Cabin blocks have dark red centers - the red symbolizes the hearth of the home. Yellow is also a popular, traditional center pattern, symbolizing a candle in the window. There is a myth that Log Cabin quilts with black centers were used to mark stops on the Underground Railroad, and while it's a charming story, quilt historians have been unable to find quilts with black centers (or record of such things) dating from the correct time period.

Labels: